 These instructions show how to create contact sheets that solves disadvantages 1-3. But what about 4? In addition to the instructions in the link above, do this:
1. Open the Print Module in Adobe Lightroom.
2. Check the Photo Info box.
3. Select "Edit..." in the Custom Settings dropdown adjacent to the Photo Info checkbox.
4. The Text Template Editor window opens.
5. You are now presented with a whole lot of information that you can add to each image on your contact sheet. I label each image with just the filename and exposure information (separated by a comma and space). For me, the top text box in the window looks like:
{Filename>>}, {Exposure>>}
Now I have a quick and easy way to create contact sheets. Perusing my gimungous collection of photographs has never been easier!
These instructions show how to create contact sheets that solves disadvantages 1-3. But what about 4? In addition to the instructions in the link above, do this:
1. Open the Print Module in Adobe Lightroom.
2. Check the Photo Info box.
3. Select "Edit..." in the Custom Settings dropdown adjacent to the Photo Info checkbox.
4. The Text Template Editor window opens.
5. You are now presented with a whole lot of information that you can add to each image on your contact sheet. I label each image with just the filename and exposure information (separated by a comma and space). For me, the top text box in the window looks like:
{Filename>>}, {Exposure>>}
Now I have a quick and easy way to create contact sheets. Perusing my gimungous collection of photographs has never been easier!
Wednesday, September 10, 2008
Creating Contact Sheets
The ability to quickly take lots of photographs is an important advantage of digital over film photography. Unfortunately this results in directories filled with too many photos to keep track of. What I needed was a way to view a lot of photographs at once, so that I could compare photos very quickly to find the ones that I wanted to print or upload to the web. As a Windows user, the best I could manage was setting the directory to thumbnails view. This worked okay most of the time, but there were some disadvantages:
1. I couldn't print them as a set of thumbnails.
2. The thumbnails were too small.
3. If I had a lot of photographs in a directory, it took Windows a long time to load up all the thumbnails.
4. Each thumbnail was only labeled with its filename. I wanted to see the exposure information too. This could help me distinguish one series of bracketed shots from another (e.g. photos destined to be combined into a single HDR image).
What I needed were contact sheets of all my photographs. I did not know where to begin, so I snooped around the web and found instructions on how to create contact sheets using Adobe Lightroom here.
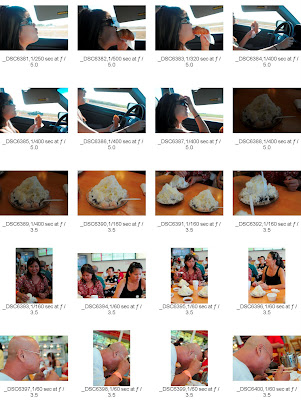 These instructions show how to create contact sheets that solves disadvantages 1-3. But what about 4? In addition to the instructions in the link above, do this:
1. Open the Print Module in Adobe Lightroom.
2. Check the Photo Info box.
3. Select "Edit..." in the Custom Settings dropdown adjacent to the Photo Info checkbox.
4. The Text Template Editor window opens.
5. You are now presented with a whole lot of information that you can add to each image on your contact sheet. I label each image with just the filename and exposure information (separated by a comma and space). For me, the top text box in the window looks like:
{Filename>>}, {Exposure>>}
Now I have a quick and easy way to create contact sheets. Perusing my gimungous collection of photographs has never been easier!
These instructions show how to create contact sheets that solves disadvantages 1-3. But what about 4? In addition to the instructions in the link above, do this:
1. Open the Print Module in Adobe Lightroom.
2. Check the Photo Info box.
3. Select "Edit..." in the Custom Settings dropdown adjacent to the Photo Info checkbox.
4. The Text Template Editor window opens.
5. You are now presented with a whole lot of information that you can add to each image on your contact sheet. I label each image with just the filename and exposure information (separated by a comma and space). For me, the top text box in the window looks like:
{Filename>>}, {Exposure>>}
Now I have a quick and easy way to create contact sheets. Perusing my gimungous collection of photographs has never been easier!
These instructions show how to create contact sheets that solves disadvantages 1-3. But what about 4? In addition to the instructions in the link above, do this:
1. Open the Print Module in Adobe Lightroom.
2. Check the Photo Info box.
3. Select "Edit..." in the Custom Settings dropdown adjacent to the Photo Info checkbox.
4. The Text Template Editor window opens.
5. You are now presented with a whole lot of information that you can add to each image on your contact sheet. I label each image with just the filename and exposure information (separated by a comma and space). For me, the top text box in the window looks like:
{Filename>>}, {Exposure>>}
Now I have a quick and easy way to create contact sheets. Perusing my gimungous collection of photographs has never been easier!


Tuesday, September 9, 2008
Art or Rubbish?
 This is an HDR image of the view from the reception desk of my company. I tried to make it look realistic, but finally gave up and tweaked the heck out of it to make it look "artsy". Is this art or rubbish? I don't know.
Saturday, September 6, 2008
Quickie Post
 I'm leaving for Los Angeles in a little while. Instead of a proper fully-formed post, I present yet another picture of my goddaughter Kasey. This is her getting ready to eat baby food.
Thursday, September 4, 2008
My Second HDR Image
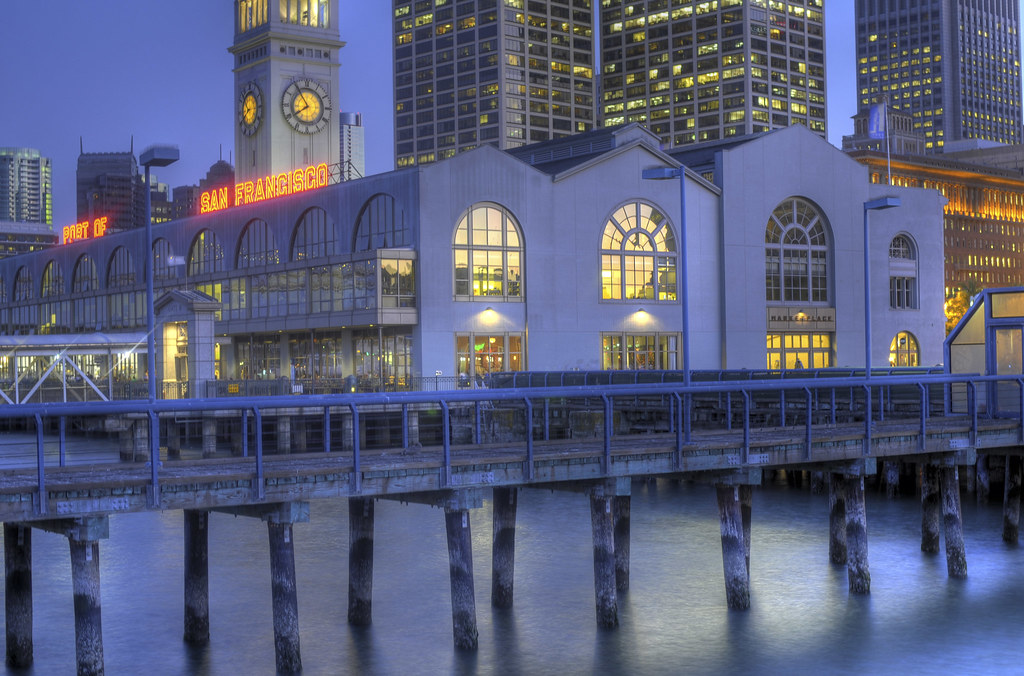 This is my second attempt at creating an HDR image. I wanted to take this photo during sundown, but ended up hanging out with coworkers at the pub a little too long. I'll try to try again tomorrow evening.
Here's how I did it:
I put my camera on a railing and set it to aperture priority mode, so the depth of field remained constant. I used the camera's bracketing function to shoot nine photos from -8/3 EV to +8/3 EV. I then used Photomatix 3.0 to increase the saturation and combine the nine images.
Here are the nine original photos:
This is my second attempt at creating an HDR image. I wanted to take this photo during sundown, but ended up hanging out with coworkers at the pub a little too long. I'll try to try again tomorrow evening.
Here's how I did it:
I put my camera on a railing and set it to aperture priority mode, so the depth of field remained constant. I used the camera's bracketing function to shoot nine photos from -8/3 EV to +8/3 EV. I then used Photomatix 3.0 to increase the saturation and combine the nine images.
Here are the nine original photos:


 Next: The Bay Bridge!
Wednesday, September 3, 2008
My First High Dynamic Range (HDR) Images
 I was too lazy to leave my front yard, so the photo is not impressive at all, but I'm just starting to get my feet wet. There's so much to learn, from picking the right shot to tweaking the final image in Photomatix.
Using Photomatix, I increased the saturation of the first image. The image below was created using the default settings. Update: Although the bottom image doesn't pop and is frankly not very good, it is a very close approximation of what my eyes perceived. That in itself is amazing to me.
 Here's how I did it:
I put my camera on a tripod, set it to aperture priority mode and shot seven photos from -3 EV to +3 EV. Clarification: I put the camera into aperture priority mode, so that the aperture and hence the depth of field remained constant. I then used Photomatix 3.0 to adjust the saturation (first image only) and combine the seven images. This was my first time using Photomatix, but thanks to this excellent tutorial, I was able to create these HDR images quickly.
Here are the seven original photos:
Here's how I did it:
I put my camera on a tripod, set it to aperture priority mode and shot seven photos from -3 EV to +3 EV. Clarification: I put the camera into aperture priority mode, so that the aperture and hence the depth of field remained constant. I then used Photomatix 3.0 to adjust the saturation (first image only) and combine the seven images. This was my first time using Photomatix, but thanks to this excellent tutorial, I was able to create these HDR images quickly.
Here are the seven original photos:


 This is fun stuff. I look forward to lugging around my camera and tripod and creating more HDR images.
Tuesday, September 2, 2008
Lesson Learned: Shot Selection
 I was at a friend's BBQ over the weekend and there were tons of babies, so I took lots of pictures of them and their parents. Unfortunately after looking at all my shots, I realized I forgot to shoot photos of the host and his baby (shown above). I have lots of pictures of him and lots of pictures of his baby, but none with the two of them together. What a bummer. In the future, I need to jot down some pre-determined must-have shots, so that I have everyone covered.
Monday, September 1, 2008
Critique: Portraits of Mark's Dad
Happy Labor Day! Let's jump right to it. During the weekend I had the opportunity to shoot some photos of my buddy Mark's dad.
In this first photo, I don't like the overall darkness of the lit part of his face. The flash was set at 1/4-1/2 power and shot through an umbrella. It was midnight, so there was very little ambient light. Upping the power of the flash or opening up the aperture, washed out his face. Should I have moved the umbrella closer to his face? Farther? More investigation and experimentation is needed.
 Photo info: 52.5mm focal length, f/6.3, 1/250 sec, ISO 200, 1/4 or 1/2 flash power, 24mm flash zoom, shoot-through umbrella, 12:38 am
In the next photo, Mark held up aluminum foil next to the right side of his dad's face to provide some fill light. I like the effect. It's certainly cheaper than buying an additional flash, but not as convenient for me because I can only be at one place at one time and I can't afford an assistant. :-)
Photo info: 52.5mm focal length, f/6.3, 1/250 sec, ISO 200, 1/4 or 1/2 flash power, 24mm flash zoom, shoot-through umbrella, 12:38 am
In the next photo, Mark held up aluminum foil next to the right side of his dad's face to provide some fill light. I like the effect. It's certainly cheaper than buying an additional flash, but not as convenient for me because I can only be at one place at one time and I can't afford an assistant. :-)
 Photo info: 52.5mm focal length, f/5, 1/250 sec, ISO 200, 1/4 or 1/2 flash power, 24mm flash zoom, shoot-through umbrella, 12:39 am
Setup shot with Mark holding up the aluminum foil. Notice how far the umbrella is from Mark's dad!
Photo info: 52.5mm focal length, f/5, 1/250 sec, ISO 200, 1/4 or 1/2 flash power, 24mm flash zoom, shoot-through umbrella, 12:39 am
Setup shot with Mark holding up the aluminum foil. Notice how far the umbrella is from Mark's dad!
 Photo info: 52.5mm focal length, f/5, 1/250 sec, ISO 200, 1/4 or 1/2 flash power, 24mm flash zoom, shoot-through umbrella, 12:39 am
There's still so much to learn!
Photo info: 52.5mm focal length, f/5, 1/250 sec, ISO 200, 1/4 or 1/2 flash power, 24mm flash zoom, shoot-through umbrella, 12:39 am
There's still so much to learn!
 Photo info: 52.5mm focal length, f/6.3, 1/250 sec, ISO 200, 1/4 or 1/2 flash power, 24mm flash zoom, shoot-through umbrella, 12:38 am
In the next photo, Mark held up aluminum foil next to the right side of his dad's face to provide some fill light. I like the effect. It's certainly cheaper than buying an additional flash, but not as convenient for me because I can only be at one place at one time and I can't afford an assistant. :-)
Photo info: 52.5mm focal length, f/6.3, 1/250 sec, ISO 200, 1/4 or 1/2 flash power, 24mm flash zoom, shoot-through umbrella, 12:38 am
In the next photo, Mark held up aluminum foil next to the right side of his dad's face to provide some fill light. I like the effect. It's certainly cheaper than buying an additional flash, but not as convenient for me because I can only be at one place at one time and I can't afford an assistant. :-)
 Photo info: 52.5mm focal length, f/5, 1/250 sec, ISO 200, 1/4 or 1/2 flash power, 24mm flash zoom, shoot-through umbrella, 12:39 am
Setup shot with Mark holding up the aluminum foil. Notice how far the umbrella is from Mark's dad!
Photo info: 52.5mm focal length, f/5, 1/250 sec, ISO 200, 1/4 or 1/2 flash power, 24mm flash zoom, shoot-through umbrella, 12:39 am
Setup shot with Mark holding up the aluminum foil. Notice how far the umbrella is from Mark's dad!
 Photo info: 52.5mm focal length, f/5, 1/250 sec, ISO 200, 1/4 or 1/2 flash power, 24mm flash zoom, shoot-through umbrella, 12:39 am
There's still so much to learn!
Photo info: 52.5mm focal length, f/5, 1/250 sec, ISO 200, 1/4 or 1/2 flash power, 24mm flash zoom, shoot-through umbrella, 12:39 am
There's still so much to learn!
Subscribe to:
Posts (Atom)


 Posts
Posts


