 The fact that this was taken with an iPhone cannot be used as an excuse. In fact, the "viewfinder" is giant compared to an SLR, so I should have got this right. This was taken over seven months ago and I like to think that I've improved my composition skills since then...but I'm not sure of that!
Tuesday, September 30, 2008
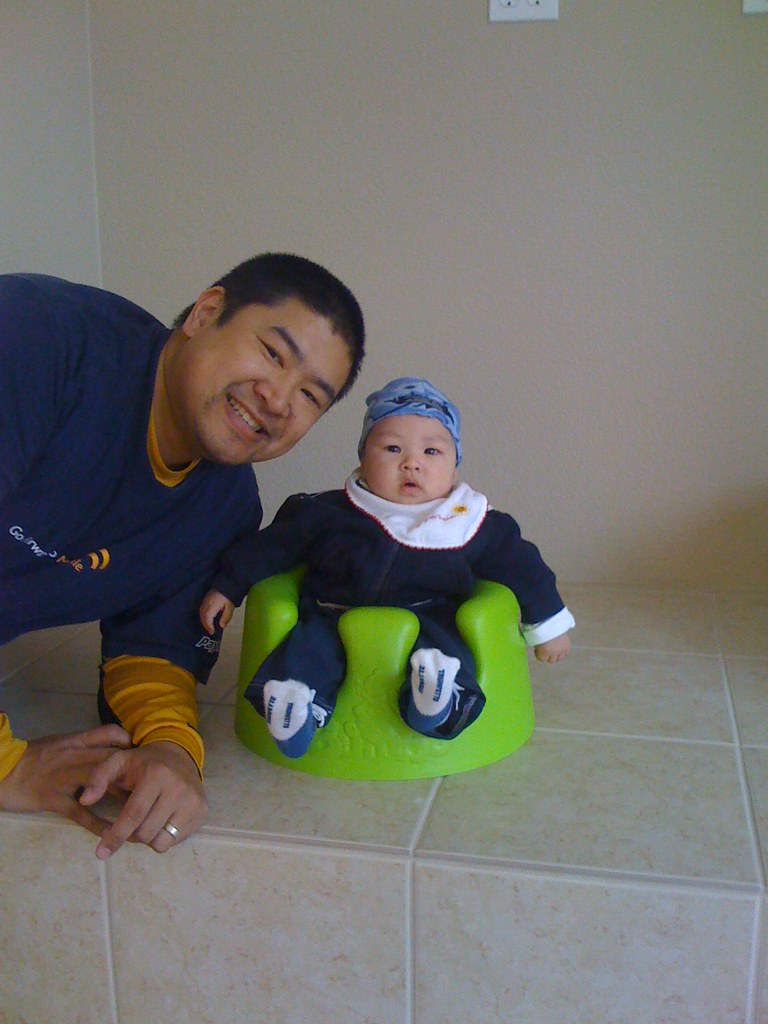
Critique: Poor Composition of Eric and Evan
This shot of Eric and his son Evan was very poorly composed. You can see that Eric's body is cut off while there's too much wall space on the right. There is also too much space above their heads.
The fact that this was taken with an iPhone cannot be used as an excuse. In fact, the "viewfinder" is giant compared to an SLR, so I should have got this right. This was taken over seven months ago and I like to think that I've improved my composition skills since then...but I'm not sure of that!
The fact that this was taken with an iPhone cannot be used as an excuse. In fact, the "viewfinder" is giant compared to an SLR, so I should have got this right. This was taken over seven months ago and I like to think that I've improved my composition skills since then...but I'm not sure of that!
Lesson Learned: Be Careful Mixing Flash and Ambient Sources
In one of my first posts, I asked the question, "If I want to mix incandescent light sources with diffused sunlight, will my white balance get thrown off?" A broader question is: Will mixing lights of different color temperatures cause problems? The answer is yes on both counts.
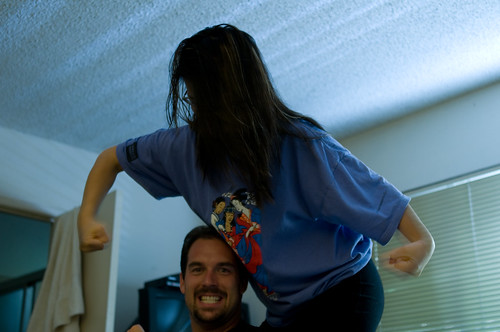 In this picture, I forgot to gel my flash to match the color temperature of the tungsten torch lamp in the room. The torch lamp was at 5:00 camera right while the bare flash was positioned at 2:00 camera right (on the other side of the window blinds). The torch lamp illuminated Matt's face and Esther's arms while the flash lit up the ceiling and left wall. Using Adobe Lightroom I balanced for tungsten and Matt's face more or less appears correct, but the ceiling and wall look too blue. If I had gelled the flash with a 1/4 or 1/2 CTO, then the ceiling and wall would have looked more warm (more orange and less blue).
David Hobby has a great Q & A post about this issue.
In this picture, I forgot to gel my flash to match the color temperature of the tungsten torch lamp in the room. The torch lamp was at 5:00 camera right while the bare flash was positioned at 2:00 camera right (on the other side of the window blinds). The torch lamp illuminated Matt's face and Esther's arms while the flash lit up the ceiling and left wall. Using Adobe Lightroom I balanced for tungsten and Matt's face more or less appears correct, but the ceiling and wall look too blue. If I had gelled the flash with a 1/4 or 1/2 CTO, then the ceiling and wall would have looked more warm (more orange and less blue).
David Hobby has a great Q & A post about this issue.
Monday, September 29, 2008
I Wish I Had Another Lighting Kit
 This weekend I took some group pictures of my family during sunset. One flash shot through an umbrella did not seem powerful enough to light everyone. You can see that my brother's face is in shadows.
I need a second flash and umbrella. The flash was 3 feet away from my sister at 8:00 camera left and about 6 feet high. The flash was set to full power and around 24mm zoom. The sun was setting at 4:00 camera right and I was hoping that it would be enough to light the right side of the frame. Having a second lighting kit positioned at camera right would have provided more even lighting.
I need a second flash and umbrella! Or do I? What if I had moved my single lighting kit to 7:00 camera left? Or even moved it right over my camera, so that it provided on-axis lighting? Only one way to find out. Next time I do a group shot, I'll give it a try and report back my results.
This weekend I took some group pictures of my family during sunset. One flash shot through an umbrella did not seem powerful enough to light everyone. You can see that my brother's face is in shadows.
I need a second flash and umbrella. The flash was 3 feet away from my sister at 8:00 camera left and about 6 feet high. The flash was set to full power and around 24mm zoom. The sun was setting at 4:00 camera right and I was hoping that it would be enough to light the right side of the frame. Having a second lighting kit positioned at camera right would have provided more even lighting.
I need a second flash and umbrella! Or do I? What if I had moved my single lighting kit to 7:00 camera left? Or even moved it right over my camera, so that it provided on-axis lighting? Only one way to find out. Next time I do a group shot, I'll give it a try and report back my results.
Sunday, September 28, 2008
I Wish I Had A Wider Lens
Since I'm sleepy, this will be a quickie post. I'll save the more interesting (aka wordy) posts for later.
 I went to Sacramento this weekend to hang out with my family. I really wish I had something wider than a 35mm prime lens attached to an APS-C sensor DSLR. It would have been nice to see both of Matt's hands.
I went to Sacramento this weekend to hang out with my family. I really wish I had something wider than a 35mm prime lens attached to an APS-C sensor DSLR. It would have been nice to see both of Matt's hands.
Saturday, September 27, 2008
Lesson Learned: Avoid Guessing
I have a bad habit of getting the exposure wrong on the first shot. I carry my camera all over the place and my default settings are typically 1/250, f/5.6, and ISO 200. Often I'll pull out the camera and even though my experience tells me that those default settings will result in an overexposed or underexposed image (see below), I snap off a shot hoping that it will somehow miraculously create a properly exposed photograph.
 Photo info: 52.5mm focal length, 1/250 sec, f/4, ISO 2500, 7:22 pm
Last week I was heading to the One Man Star Wars show in San Francisco, when I encountered these die-hard fans. In this instance. I made a feeble attempt to adjust the exposure correctly by increasing the ISO and opening up the aperture. Unfortunately I again did not pay close enough attention to the camera's exposure meter.
Here's the final image. Too bad I've got lens flare issues again. Darn it!
Photo info: 52.5mm focal length, 1/250 sec, f/4, ISO 2500, 7:22 pm
Last week I was heading to the One Man Star Wars show in San Francisco, when I encountered these die-hard fans. In this instance. I made a feeble attempt to adjust the exposure correctly by increasing the ISO and opening up the aperture. Unfortunately I again did not pay close enough attention to the camera's exposure meter.
Here's the final image. Too bad I've got lens flare issues again. Darn it!
 Photo info: 52.5mm focal length, 1/50 sec, f/2, ISO 2500, 7:22 pm
Friday, September 26, 2008
iPhone Pics: Vancouver
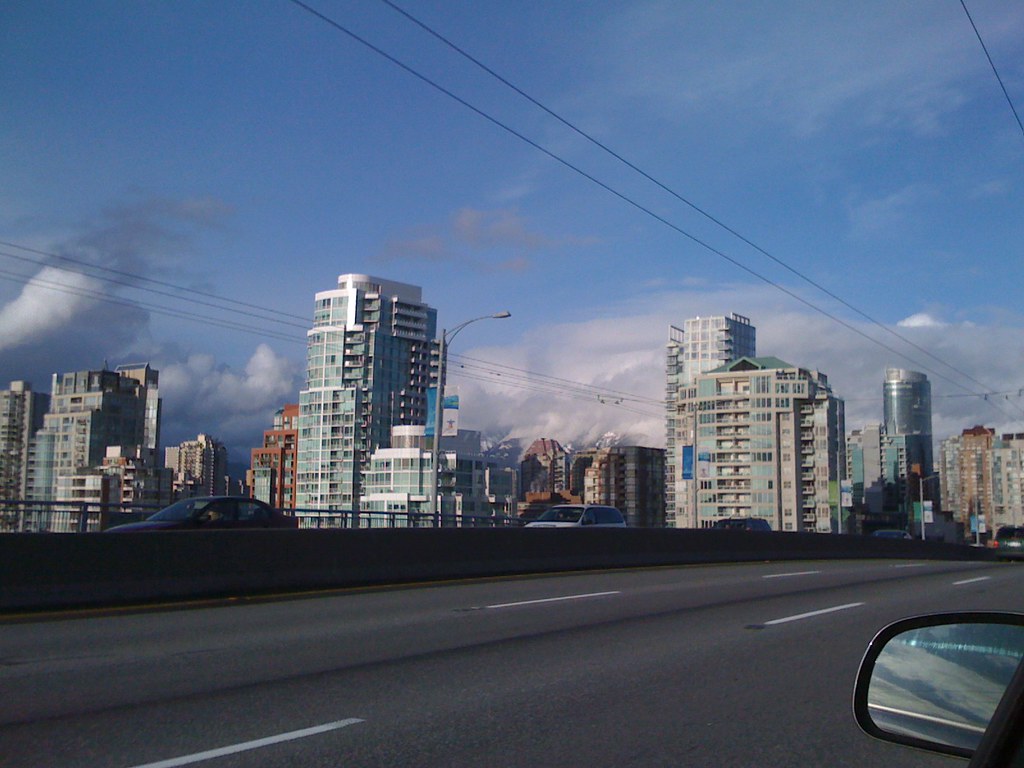 Do you need a fancy $2000 camera to create great pictures? Not as long as you view them at a reasonable size. At 1024 x 768 pixels these shots of Vancouver taken last February look pretty good.
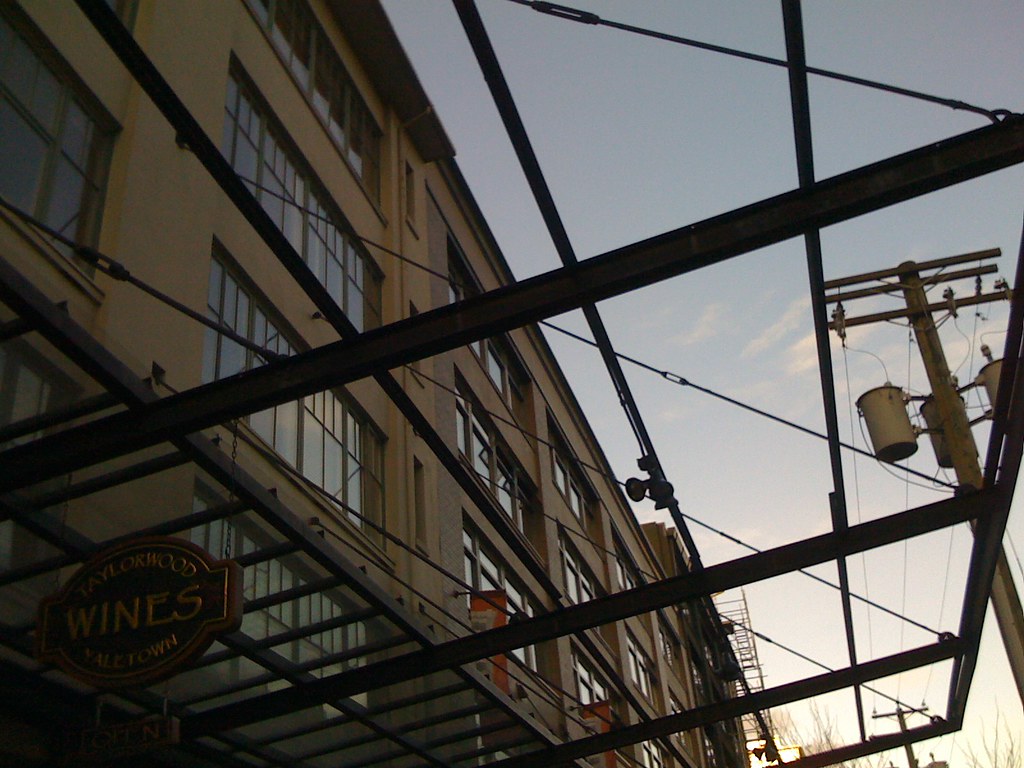 Of course neither of these photos are museum quality, but they were taken with a phone. A phone!!! So the next time you see something cool you want to snap a shot of and you forgot your "real" camera at home (for shame!), pull out your camera phone. Something is better than nothing!
Thursday, September 25, 2008
Rough Start: Phottix Cleon Wireless Remote N8
The wireless remote for my camera came in yesterday, but I was disappointed that the transmitter didn't work. I would have chosen the reliable Nikon ML-3 over the Phottix except at $33.90 the Phottix is $130 cheaper and it doesn't require line-of-sight like the ML-3's infared transmitter.
I bought the remote off eBay from HKSupplies. I sent them an email about the condition of the remote and they responded within two hours. Since they're based in Hong Kong, I posted a video of me trying to trigger the shutter via the transmitter. I'm hoping they can figure out what's going on. It's nice that they are ready to send me a replacement transmitter or receiver.
In the meantime, the receiver works as a tethered remote, so all is not lost. It seems like I've been bitten in the butt the two times I chose an off-brand alternative to a Nikon piece of gear. The first time this happened was with the Vivitar 285HV.
I will update this post when this issue gets resolved.
Wednesday, September 24, 2008
Lesson Learned: Redrum!
Or rather, RED ROOM! The people in the photos I took during the first two hours at the Stymie & the Pimp Jones Love Orchestra gig looked too red.
 When I entered the club, I noticed there were red tungsten lights along the walls and on the ceiling, so I placed a CTO gel over my flash. My goal was to try to match the color of the light cast by the flash with the color cast by the lights in the club. Unfortunately I did not notice that the ceiling was red.
 I think that because I bounced the light of my flash off of the ceiling, the CTO light plus the red ceiling combined to create a very orange/red tint on the subjects. I can't be positive about this until I test the CTO light on a white ceiling.
Take a look the following two photos. The first one was taken with the CTO gel, the second was taken with just the bare flash. You can see that the piece of paper looks very red in the first photo, but very white in the second photo.
I think that because I bounced the light of my flash off of the ceiling, the CTO light plus the red ceiling combined to create a very orange/red tint on the subjects. I can't be positive about this until I test the CTO light on a white ceiling.
Take a look the following two photos. The first one was taken with the CTO gel, the second was taken with just the bare flash. You can see that the piece of paper looks very red in the first photo, but very white in the second photo.

 Some retorts you may have:
Who cares? During post, modify the color temperature to reduce the redness. The red pictures were so red that there was less latitude in Lightroom for me to adjust the color temperature.
Instead of using a full CTO gel, you should have used a 1/2 or 1/4 CTO gel. I only brought my full CTO gel. Next time, I'll bring lower intensity CTO gels.
The red photos look more realistic, so you should have left the CTO gel on the flash. I agree!
The lesson I learned here is that I need to be more aware of the surfaces that are reflecting my flash.
Some retorts you may have:
Who cares? During post, modify the color temperature to reduce the redness. The red pictures were so red that there was less latitude in Lightroom for me to adjust the color temperature.
Instead of using a full CTO gel, you should have used a 1/2 or 1/4 CTO gel. I only brought my full CTO gel. Next time, I'll bring lower intensity CTO gels.
The red photos look more realistic, so you should have left the CTO gel on the flash. I agree!
The lesson I learned here is that I need to be more aware of the surfaces that are reflecting my flash.
Tuesday, September 23, 2008
Lesson Learned: Get More Memory Cards
You can never have too much memory. I have a 12+ MP camera and I shoot RAW. I own two 4 GB CompactFlash cards, so I can fit a total of around 500 photos. This is usually enough for most situations, but not always.
During the Stymie & the Pimp Jones Love Orchestra gig, I ran out of memory a few times, so I was forced to delete photos directly off my camera and that sucked. While there's a histogram to help me weed out the underexposed or blown out photos, finding the badly focused shots was very difficult on the LCD screen (even the 3" screen was too small).
Here are some photos that I thought were in focus. I hope I didn't delete properly focused ones in place of these!
 Photo info: 52.5mm focal length, 1/60 sec, f/2, ISO 200, auto flash power with -3 EV flash compensation, 14 mm flash zoom through diffuser, flash mounted on camera pointed forward at 60 degrees, 9:16 pm
 Photo info: 52.5mm focal length, 1/40 sec, f/2, ISO 6400, 12:03 am
Denouement: I ordered three 4 GB cards yesterday and they arrive next week :-)
Photo info: 52.5mm focal length, 1/40 sec, f/2, ISO 6400, 12:03 am
Denouement: I ordered three 4 GB cards yesterday and they arrive next week :-)
Monday, September 22, 2008
Lesson Learned: Know Your Gear
This is the second installment of lessons I learned from the Stymie & the Pimp Jones Love Orchestra gig. The club was very dark, so even the simplest task, from adjusting the ISO to swapping the CompactFlash card in my camera, was difficult to do.
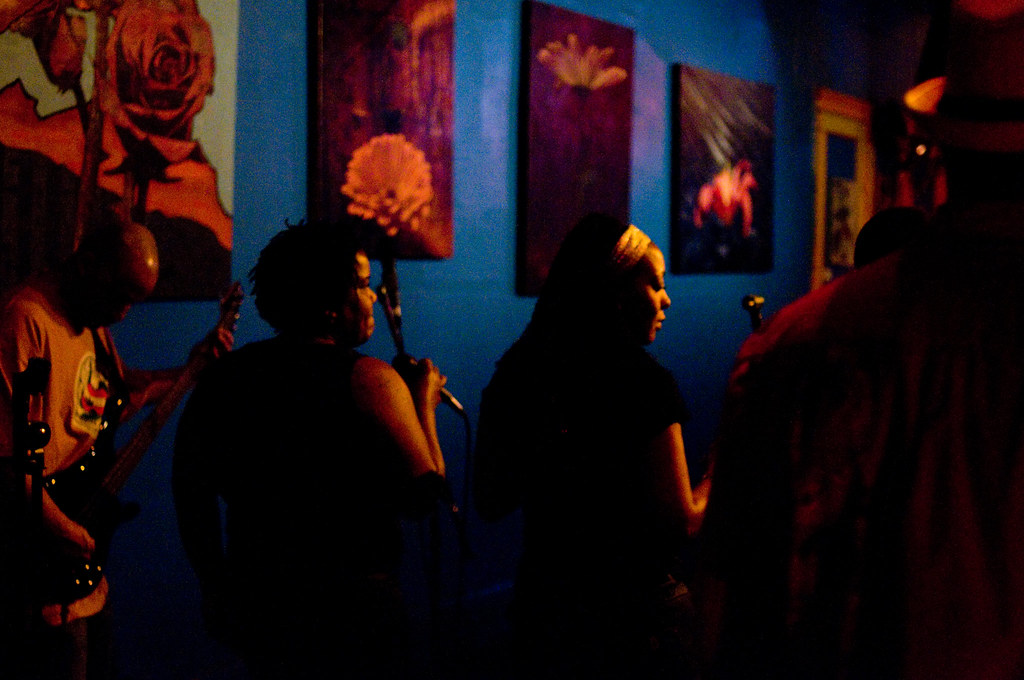 Photo info: 52.5mm focal length, 1/50 sec, f/2, ISO 1600, 9:17 pm
Good thing I've been getting a lot of practice with my camera lately, otherwise it would be have been nearly impossible to do anything. Having a small LED flashlight also came in handy. I do have to practice changing the batteries in my flash while the flash is attached to the camera, it's definitely a challenge in the dark.
On top of the low light situation, the club was very crowded, so people were bumping into me and I was constantly afraid of beer spilling on my gear.
So go out and take lots of pictures. Practice changing the exposure time, aperture, ISO, focus modes, AF modes, switching CF cards, swapping batteries, and pretty everything else until it's all second nature.
Photo info: 52.5mm focal length, 1/50 sec, f/2, ISO 1600, 9:17 pm
Good thing I've been getting a lot of practice with my camera lately, otherwise it would be have been nearly impossible to do anything. Having a small LED flashlight also came in handy. I do have to practice changing the batteries in my flash while the flash is attached to the camera, it's definitely a challenge in the dark.
On top of the low light situation, the club was very crowded, so people were bumping into me and I was constantly afraid of beer spilling on my gear.
So go out and take lots of pictures. Practice changing the exposure time, aperture, ISO, focus modes, AF modes, switching CF cards, swapping batteries, and pretty everything else until it's all second nature.
Sunday, September 21, 2008
Lesson Learned: High ISO Sensitivity Matters
This weekend my buddy Brigham, the trombonist for Stymie & the Pimp Jones Love Orchestra, asked me to shoot their gig at Mojito in San Francisco. I jumped at the chance. But with new opportunities came new challenges and new lessons learned. Over the next few days I will post everything I learned from that evening.
The first lesson I learned is that having a camera with a very high ISO sensitivity IS important after all! It turns out that flash isn't always the answer.
The photo below is very dark and full of noise. It's kind of artistic, but all the details are obscured.
 Photo info: 52.5mm focal length, 1/40 sec, f/2, ISO 6400, 11:18 pm
I had to resort to flash.
Photo info: 52.5mm focal length, 1/40 sec, f/2, ISO 6400, 11:18 pm
I had to resort to flash.
 Photo info: 52.5mm focal length, 1/125 sec, f/5.6, ISO 400, auto flash power with -3 EV flash compensation, 14mm flash zoom through diffuser, flash mounted on camera pointed forward at 60 degrees, 11:25 pm
The flash blasted the subjects. The club was poorly lit, which provided a dark atmosphere to enjoy the music. Although my camera-mounted flash was pointed up at a slight forward angle through a diffuser and with a flash compensation value of -3 EV (minimum value allowed), the reflected light still overpowered people.
At first I put the flash into manual mode and set it to low power. I liked the subtle effect, but the flash did not have enough power to light the entire person. I also did not have the time to constantly fiddle with the power. Consequently, I had to set my flash to automatically adjust its power in conjunction with the exposure information from the camera.
So am I going to rush to the store and replace my camera with a new high ISO one from Canon or Nikon? Heck no!
Update: Check out the gig pics on flickr.
Photo info: 52.5mm focal length, 1/125 sec, f/5.6, ISO 400, auto flash power with -3 EV flash compensation, 14mm flash zoom through diffuser, flash mounted on camera pointed forward at 60 degrees, 11:25 pm
The flash blasted the subjects. The club was poorly lit, which provided a dark atmosphere to enjoy the music. Although my camera-mounted flash was pointed up at a slight forward angle through a diffuser and with a flash compensation value of -3 EV (minimum value allowed), the reflected light still overpowered people.
At first I put the flash into manual mode and set it to low power. I liked the subtle effect, but the flash did not have enough power to light the entire person. I also did not have the time to constantly fiddle with the power. Consequently, I had to set my flash to automatically adjust its power in conjunction with the exposure information from the camera.
So am I going to rush to the store and replace my camera with a new high ISO one from Canon or Nikon? Heck no!
Update: Check out the gig pics on flickr.
Saturday, September 20, 2008
Tiptoeing Back Into Post-Processing
Last month I wrote that I wasn't going to do any post-processing for awhile. But inspired by my buddy Basile's Jabbawockeez pics (he's the guy on the far right in the photos below), I decided to experiment again. I don't like the result too much, but I forgot how fun it is to tweak photos.
My experiment:
 Adobe Lightroom: Applied Creative - Cold Tone Preset, cropped, lowered color temperature, increased blacks, and increased clarity
The original:
Adobe Lightroom: Applied Creative - Cold Tone Preset, cropped, lowered color temperature, increased blacks, and increased clarity
The original:
 Photo info: 52.5mm focal length, 1/80 sec, f/2, ISO 200, 2:35 pm
Adobe Lightroom: Applied Creative - Cold Tone Preset, cropped, lowered color temperature, increased blacks, and increased clarity
The original:
Photo info: 52.5mm focal length, 1/80 sec, f/2, ISO 200, 2:35 pm
Lesson Learned: Watch Where I'm Focusing
 Problems figuring out the nuances of Lightroom's export function and waiting for a batch of photos to finish uploading to Flickr have conspired to keep me up past 4:00 am. Ugh. I might as well post another item while I'm awake!
I rarely use my camera's multi-point auto focusing modes, instead I stick with single-area AF. Sometimes the results are less than ideal.
Problems figuring out the nuances of Lightroom's export function and waiting for a batch of photos to finish uploading to Flickr have conspired to keep me up past 4:00 am. Ugh. I might as well post another item while I'm awake!
I rarely use my camera's multi-point auto focusing modes, instead I stick with single-area AF. Sometimes the results are less than ideal.


 In my defense, I have been more aware of this problem, so it happens much less frequently now. There's definitely still room for improvement however.
Friday, September 19, 2008
Comparison: Clean vs. Cluttered Backgrounds
Currently, my biggest goal is to improve how I compose my shots. One aspect of this is to unclutter the background. Inspired by Joel Sartore's excellent book Photographing Your Family, I'm paying a lot more attention to what is going on behind my subject. On the left is an example of how I recomposed my shot to reduce the impact of the kitchen items behind Melia. While still a little cluttered, I think it's significantly better than the photo on the right. By the way, neither Melia nor Kasey, nor any other kid in my blog belongs to me! :-)


Thursday, September 18, 2008
Gandalf the Neighorbood Cat
I've wanted to take a picture of this cat for a long time. He likes to hang out on my neighbor's porch. Awhile ago I had the perfect opportunity to take some picture of him, but my lame Vivitar 285HV wouldn't fire, so I left empty-handed. This time everything worked and the cat stayed calm enough for me to snap off a few photos. I really like the warm light cast by the CTO gel.
 Photo info: 52.5mm focal length, 1/50 sec, f/2, ISO 200, 1/8 flash power?, unknown flash zoom, CTO gel, flash at camera left, perpendicular to the camera axis, same height as cat, and eight feet away, 7:31 pm
 Photo info: 52.5mm focal length, 1/50 sec, f/2, ISO 200, 1/8 flash power?, unknown flash zoom, CTO gel, flash location is identical to above, except the camera has moved a little to the left, 7:31 pm
 Photo info: 52.5mm focal length, 1/50 sec, f/2, ISO 200, 1/8 flash power?, unknown flash zoom, CTO gel, flash location is identical to above, except the camera has moved a lot more to the left, so the flash is just a hair to the left of the camera, 7:32 pm
The photos are a bit dark for my taste, but in the interest of photojournalistic truth I didn't want to increase the brightness in Lightroom.
Actually the cat's name isn't really Gandalf, but he's the only gray cat in the neighborhood, so that's what I dubbed him.
Photo info: 52.5mm focal length, 1/50 sec, f/2, ISO 200, 1/8 flash power?, unknown flash zoom, CTO gel, flash location is identical to above, except the camera has moved a lot more to the left, so the flash is just a hair to the left of the camera, 7:32 pm
The photos are a bit dark for my taste, but in the interest of photojournalistic truth I didn't want to increase the brightness in Lightroom.
Actually the cat's name isn't really Gandalf, but he's the only gray cat in the neighborhood, so that's what I dubbed him.
More Gelling Fun

 In a previous post I talked about my first experience with gelling and how I had difficulty finding the right gel to match my neighbor's porch light. Well, I tried it again with better results. In the photo on the left, I used the stock CTO gel that came with my SB-800 flash. On the right is the bare flash. The gelled light looks similar to the porch light, while the bare flash looks too blue. To be fair, I should have turned down the power of the bare flash some more, but I think even if I had, the flash still would have looked too blue.
Monday, September 15, 2008
Everybody Loves an Umbrella on a Stand

 Kids (and adults!) are always curious when I set up the umbrella and stand. Little Melia couldn't get her hands and feet away from them. It was tricky trying to snap photographs while making sure that Melia didn't knock over my setup. Once her dad grabbed a hold of her, I was able to take some decent shots. Though the photo at the top is a bit dark, I do like how the soft light falls on Melia's face. Photo info: 52.5mm focal length, 1/250 sec, f/2, ISO 200, 1/16 flash power?, 24mm flash zoom?, shoot-through umbrella at camera left

Sunday, September 14, 2008
Gelling for the First Time

 Bored, I saw my neighbor's porch and thought, "What would it look like if I fell down their stairs?"
I took the first photo (left) and noticed that the light from the snooted flash was too blue and didn't match the light from the porch light. This looked like a perfect opportunity for me to play with gels for the first time.
A little over a month ago, I got a sample pack of Lee Filters from a camera rental store in San Francisco. Though not made by Rosco (the brand of choice among Strobist readers), it was the only one they offered, so I took it. I tried many of the orange and yellow tinted gels and I think I ultimately settled on medium amber (Y=50.7%). I don't know what the Y stands for. My first thought was that Y signified yellow, but I noticed that different colors sometimes share nearly equal Y values. More research is needed.
This is my first attempt and though I wasn't able to match the gel with the porch light, it was fun trying and I look forward to more experimentation.
I actually like the blueness of the flash in the left photo. It looks like a ray of light shot from heaven. :-)
Bored, I saw my neighbor's porch and thought, "What would it look like if I fell down their stairs?"
I took the first photo (left) and noticed that the light from the snooted flash was too blue and didn't match the light from the porch light. This looked like a perfect opportunity for me to play with gels for the first time.
A little over a month ago, I got a sample pack of Lee Filters from a camera rental store in San Francisco. Though not made by Rosco (the brand of choice among Strobist readers), it was the only one they offered, so I took it. I tried many of the orange and yellow tinted gels and I think I ultimately settled on medium amber (Y=50.7%). I don't know what the Y stands for. My first thought was that Y signified yellow, but I noticed that different colors sometimes share nearly equal Y values. More research is needed.
This is my first attempt and though I wasn't able to match the gel with the porch light, it was fun trying and I look forward to more experimentation.
I actually like the blueness of the flash in the left photo. It looks like a ray of light shot from heaven. :-)
Saturday, September 13, 2008
Lesson Learned: Remember the Sync Speed
 Oops! I was so concerned with tinkering with the exposure time that I forgot that I was shooting with a flash. My camera's max flash sync speed is 1/320. As you can see, the shutter started to close at the top of the frame which blocked the flash from reaching the image sensor. Luckily I chimped, saw the problem, and immediately corrected my mistake.
Photo info: 52.5mm focal length, 1/640 sec, f/3.5, ISO 200, 1/16 flash power?, 24mm flash zoom?, shoot-through umbrella
Oops! I was so concerned with tinkering with the exposure time that I forgot that I was shooting with a flash. My camera's max flash sync speed is 1/320. As you can see, the shutter started to close at the top of the frame which blocked the flash from reaching the image sensor. Luckily I chimped, saw the problem, and immediately corrected my mistake.
Photo info: 52.5mm focal length, 1/640 sec, f/3.5, ISO 200, 1/16 flash power?, 24mm flash zoom?, shoot-through umbrella
Friday, September 12, 2008
Me, Vines, and a Snoot
I read a recent post on Strobist.com about street shooting with multiple flashes providing pools of restricted light. I noticed the featured photograph contained vines that looked a lot like the ones that grow in my courtyard. Faced with another dateless Friday night, I hauled out my gear and practiced taking shots of myself.
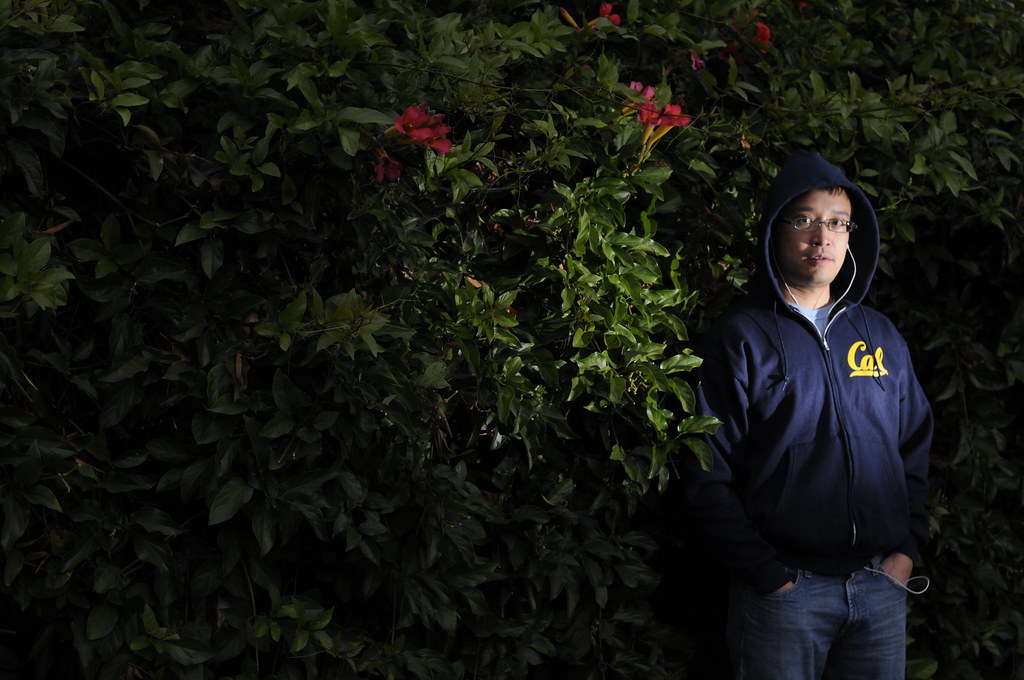 Photo info: 52.5mm focal length, 1/100 sec, f/4, ISO 400, 1/16 flash power, 105mm flash zoom, snooted, 7:16 pm
I started by taking a shot with only the ambient sunset light. I wish I faced the camera a similar way as in the rest of the pictures, so that I could see the difference the flash makes on my face.
Photo info: 52.5mm focal length, 1/100 sec, f/4, ISO 400, 1/16 flash power, 105mm flash zoom, snooted, 7:16 pm
I started by taking a shot with only the ambient sunset light. I wish I faced the camera a similar way as in the rest of the pictures, so that I could see the difference the flash makes on my face.
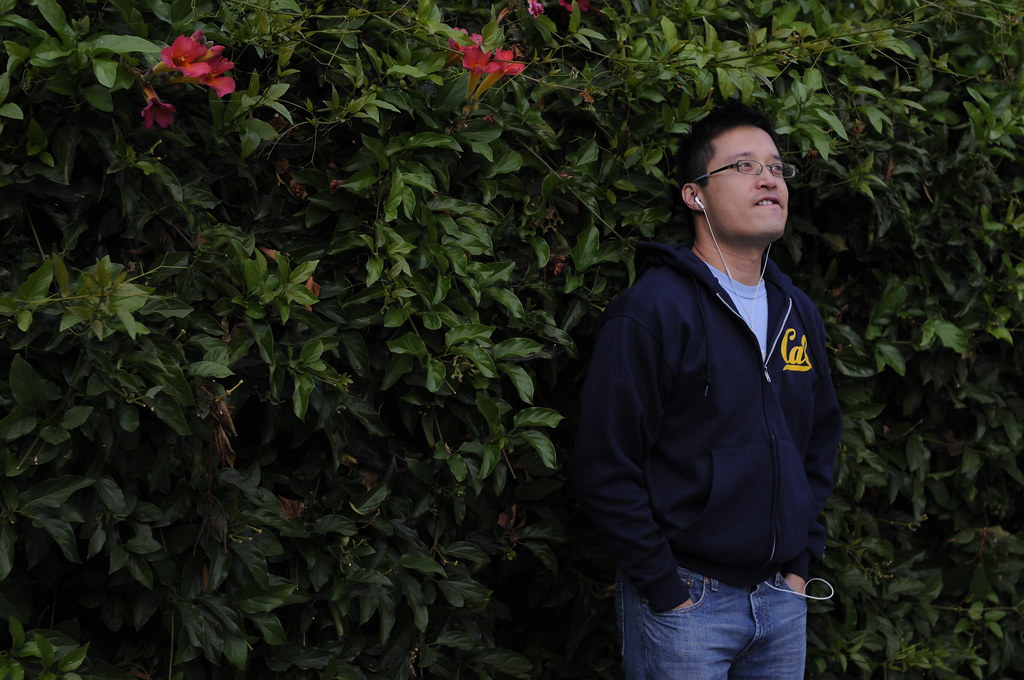 Photo info: 52.5mm focal length, 1/100 sec, f/4, ISO 400, no flash, 7:09 pm
From the ambient shot above, I nailed down the shutter, aperture, and ISO. Now all I had to do was adjust the flash. In this shot, the flash was too powerful and even at 105mm, still too wide.
Photo info: 52.5mm focal length, 1/100 sec, f/4, ISO 400, no flash, 7:09 pm
From the ambient shot above, I nailed down the shutter, aperture, and ISO. Now all I had to do was adjust the flash. In this shot, the flash was too powerful and even at 105mm, still too wide.
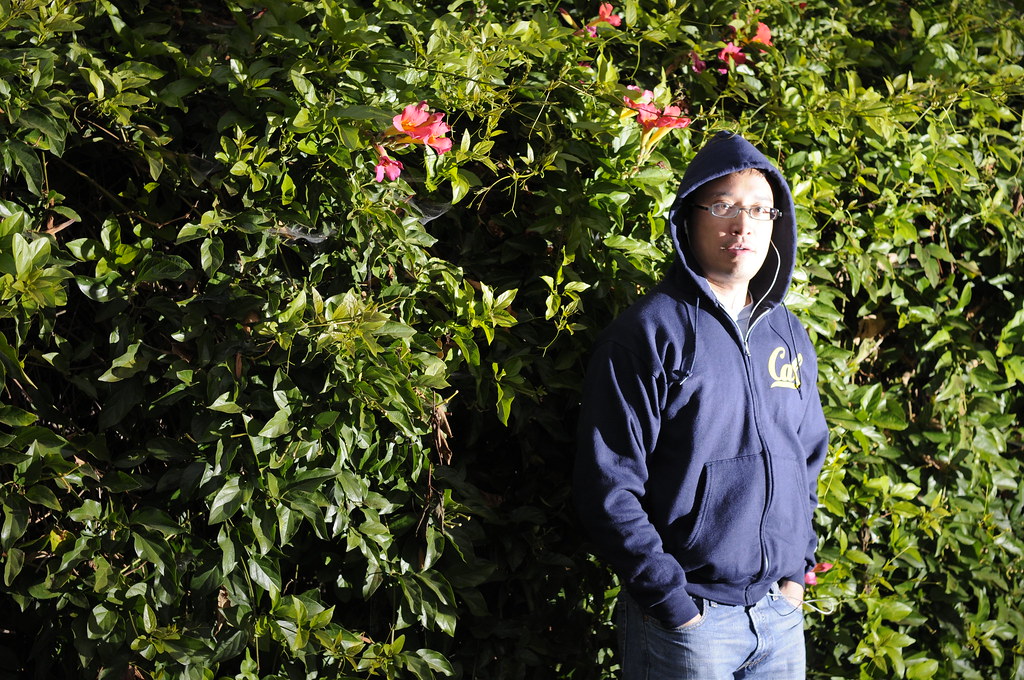 Photo info: 52.5mm focal length, 1/100 sec, f/4, ISO 400, 1/4 or 1/8 flash power, 105mm flash zoom, 7:14 pm
The flash power was spot on, but the light cast was still too wide.
Photo info: 52.5mm focal length, 1/100 sec, f/4, ISO 400, 1/4 or 1/8 flash power, 105mm flash zoom, 7:14 pm
The flash power was spot on, but the light cast was still too wide.
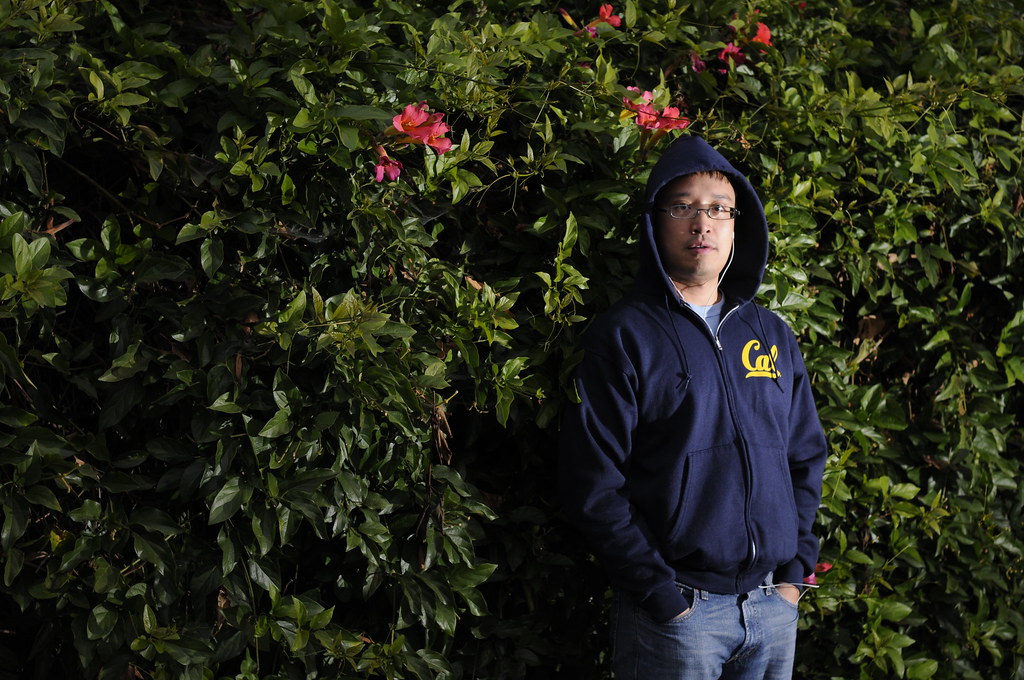 Photo info: 52.5mm focal length, 1/100 sec, f/4, ISO 400, 1/16 flash power, 105mm flash zoom, 7:14 pm
In the final shot, I snooted the flash which restricted the light immensely.
Setup: I put the flash at camera right and extended the light stand high so it shot down on me. Why? I needed the flash to cast a shadow under my chin to make my face look thinner. What can I say, I'm vain! :-)
Photo info: 52.5mm focal length, 1/100 sec, f/4, ISO 400, 1/16 flash power, 105mm flash zoom, 7:14 pm
In the final shot, I snooted the flash which restricted the light immensely.
Setup: I put the flash at camera right and extended the light stand high so it shot down on me. Why? I needed the flash to cast a shadow under my chin to make my face look thinner. What can I say, I'm vain! :-)
 One huge difference between my shots and the one that inspired it is I only used one flash, so I couldn't create multiple pools of restricted light. Oh well, I only own one working flash. Once I nail down using one flash and get a raise, I'll buy another.
Photo info: 52.5mm focal length, 1/100 sec, f/4, ISO 400, 1/16 flash power, 105mm flash zoom, snooted, 7:16 pm
I started by taking a shot with only the ambient sunset light. I wish I faced the camera a similar way as in the rest of the pictures, so that I could see the difference the flash makes on my face.
Photo info: 52.5mm focal length, 1/100 sec, f/4, ISO 400, no flash, 7:09 pm
From the ambient shot above, I nailed down the shutter, aperture, and ISO. Now all I had to do was adjust the flash. In this shot, the flash was too powerful and even at 105mm, still too wide.
Photo info: 52.5mm focal length, 1/100 sec, f/4, ISO 400, 1/4 or 1/8 flash power, 105mm flash zoom, 7:14 pm
The flash power was spot on, but the light cast was still too wide.
Photo info: 52.5mm focal length, 1/100 sec, f/4, ISO 400, 1/16 flash power, 105mm flash zoom, 7:14 pm
In the final shot, I snooted the flash which restricted the light immensely.
Setup: I put the flash at camera right and extended the light stand high so it shot down on me. Why? I needed the flash to cast a shadow under my chin to make my face look thinner. What can I say, I'm vain! :-)
 One huge difference between my shots and the one that inspired it is I only used one flash, so I couldn't create multiple pools of restricted light. Oh well, I only own one working flash. Once I nail down using one flash and get a raise, I'll buy another.
Thursday, September 11, 2008
Guess the Setup: iPhone Closeup
 Guess how I created this photo. Hint: no flash, no light painting, and no Lightroom or Photoshop tricks. Think you have it figured out? See below for the answer:
...
...
...
The main light was my laptop, which lit up the sides of the iPhone and part of my hand. The light from the phone helped illuminate the bottom of my hand. The light from the phone that reflected off my hand also added fill light to bottom of the phone (edge closest to my wrist). I turned off all the lights in my house, but left the television on. A Clash documentary was on PBS, so I couldn't turn it off. :-) I double checked that the light from the TV did not contaminate my shot.
In these setup shots, I forgot to turn off the flash on my point-and-shoot. Believe me, the room was dark except for the television, laptop, and phone.
Guess how I created this photo. Hint: no flash, no light painting, and no Lightroom or Photoshop tricks. Think you have it figured out? See below for the answer:
...
...
...
The main light was my laptop, which lit up the sides of the iPhone and part of my hand. The light from the phone helped illuminate the bottom of my hand. The light from the phone that reflected off my hand also added fill light to bottom of the phone (edge closest to my wrist). I turned off all the lights in my house, but left the television on. A Clash documentary was on PBS, so I couldn't turn it off. :-) I double checked that the light from the TV did not contaminate my shot.
In these setup shots, I forgot to turn off the flash on my point-and-shoot. Believe me, the room was dark except for the television, laptop, and phone.
 That "Macbook" you see is actually an IBM ThinkPad with an Apple sticker ;-)

 It was difficult balancing the exposure time and the aperture. Ideally the exposure time would be less than a second, because I wouldn't be able to hold my hand still for too long. But a short exposure time meant a large aperture (lower number) which meant less depth of field. For most of the phone to be in focus, I needed a smaller aperture. With the very low amount of light coming from the laptop and the phone I couldn't have both a short exposure time and a small aperture, so I decided that the focus of the phone was more important than the blurring of my hand. Through trial and error I found that f/6.3 was the largest aperture that allowed most of the phone to stay in focus. With the aperture set, I found that 3 seconds was the least amount of time needed to create the photograph I wanted. It's too bad my hand is blurry. I'm kicking myself for not remembering to increase the ISO. Dang it!
Info of the featured photo: 52.5mm focal length, 3 sec, f/6.3, ISO 200, light provided by laptop and iPhone
It was difficult balancing the exposure time and the aperture. Ideally the exposure time would be less than a second, because I wouldn't be able to hold my hand still for too long. But a short exposure time meant a large aperture (lower number) which meant less depth of field. For most of the phone to be in focus, I needed a smaller aperture. With the very low amount of light coming from the laptop and the phone I couldn't have both a short exposure time and a small aperture, so I decided that the focus of the phone was more important than the blurring of my hand. Through trial and error I found that f/6.3 was the largest aperture that allowed most of the phone to stay in focus. With the aperture set, I found that 3 seconds was the least amount of time needed to create the photograph I wanted. It's too bad my hand is blurry. I'm kicking myself for not remembering to increase the ISO. Dang it!
Info of the featured photo: 52.5mm focal length, 3 sec, f/6.3, ISO 200, light provided by laptop and iPhone
Critique: Kasey in the Mirror
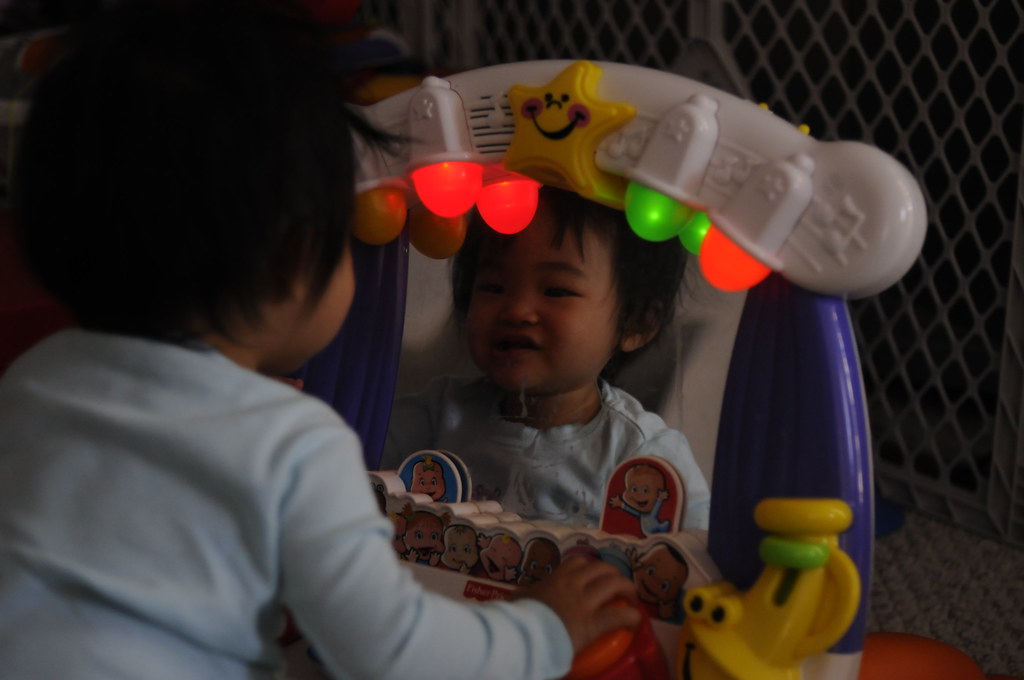 I like this picture, of course I love any photo of Kasey, but there is definitely room for improvement.
The composition isn't ideal.
There is too much uninteresting space on the right. The reason this happened was that I set the AF point to the center and was so concerned with getting her reflection in focus, that I forgot to recompose. I think adhering to the rule of thirds would have helped.
The picture is too dark.
I didn't have my flash attached otherwise I would have tried bouncing the light off the ceiling. But I'm not a big fan of non-directional flash, so I'm happy I didn't introduce artificial light. My ISO was already pushed to 800, but I could have increased the exposure time to 1/100 or even 1/50 and that may have helped.
Of course I could have cropped and increased the brightness of the dark areas using Lightroom, but until my carpal tunnel goes away, I'm doing as little post-processing as possible.
Photo info: 52.5mm focal length, 1/200 sec, f/2.2, ISO 800
I like this picture, of course I love any photo of Kasey, but there is definitely room for improvement.
The composition isn't ideal.
There is too much uninteresting space on the right. The reason this happened was that I set the AF point to the center and was so concerned with getting her reflection in focus, that I forgot to recompose. I think adhering to the rule of thirds would have helped.
The picture is too dark.
I didn't have my flash attached otherwise I would have tried bouncing the light off the ceiling. But I'm not a big fan of non-directional flash, so I'm happy I didn't introduce artificial light. My ISO was already pushed to 800, but I could have increased the exposure time to 1/100 or even 1/50 and that may have helped.
Of course I could have cropped and increased the brightness of the dark areas using Lightroom, but until my carpal tunnel goes away, I'm doing as little post-processing as possible.
Photo info: 52.5mm focal length, 1/200 sec, f/2.2, ISO 800
Wednesday, September 10, 2008
Quasi-Illegal Shot?
 In my previous post, I took a long exposure shot of Interstate 80 from a pedestrian bridge. My camera was mounted on a tripod. I didn't know if I was breaking any laws by setting up my camera and tripod on a bridge overlooking traffic at night.
I figured that if it was illegal, it would be best for me to work as quickly as possible. To that end, I did as much as possible at the base of the bridge: I attached my camera to the tripod and pulled out all the legs. Once I was all set up, I nonchalantly walked to the middle of the bridge and nervously snapped off around twenty shots.
In my previous post, I took a long exposure shot of Interstate 80 from a pedestrian bridge. My camera was mounted on a tripod. I didn't know if I was breaking any laws by setting up my camera and tripod on a bridge overlooking traffic at night.
I figured that if it was illegal, it would be best for me to work as quickly as possible. To that end, I did as much as possible at the base of the bridge: I attached my camera to the tripod and pulled out all the legs. Once I was all set up, I nonchalantly walked to the middle of the bridge and nervously snapped off around twenty shots.
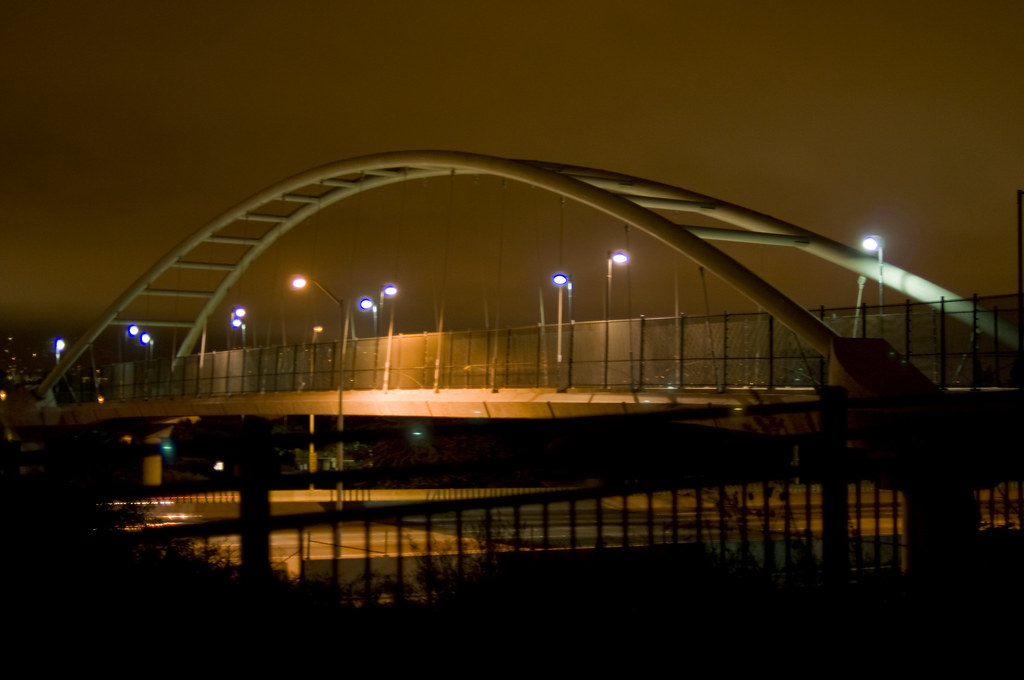
Berkeley Freeway at Night
 Since junior high school, I've wanted to take a long exposure night shot of Interstate 80 near Berkeley. But it wasn't practical back then because of a lot of reasons:
1. All I had was my mom's Ricoh KR5 SLR (which she bought sometime around 1973).
2. I didn't have the money for enough film to get the right shot.
3. I didn't own a tripod
4. There wasn't a good spot to take the shot.
5. I lived in Sacramento.
Now, over twenty years later, it's practical because:
1. I own a digital SLR.
2. I have two 4GB CompactFlash cards.
3. I own a tripod.
4. A pedestrian bridge overlooking the highway now exists.
5. I live less than ten miles away in Oakland.
Now onto the critique of the photo. I hate hate hate the chain link fence! It's not the look I was going for. I didn't realize that the bridge was surrounded by fencing until I was halfway up the bridge. Safety first I guess. Darn it.
Photo info: 52.5mm focal length, f/13, 10 sec, ISO 200, 8:18 pm
Since junior high school, I've wanted to take a long exposure night shot of Interstate 80 near Berkeley. But it wasn't practical back then because of a lot of reasons:
1. All I had was my mom's Ricoh KR5 SLR (which she bought sometime around 1973).
2. I didn't have the money for enough film to get the right shot.
3. I didn't own a tripod
4. There wasn't a good spot to take the shot.
5. I lived in Sacramento.
Now, over twenty years later, it's practical because:
1. I own a digital SLR.
2. I have two 4GB CompactFlash cards.
3. I own a tripod.
4. A pedestrian bridge overlooking the highway now exists.
5. I live less than ten miles away in Oakland.
Now onto the critique of the photo. I hate hate hate the chain link fence! It's not the look I was going for. I didn't realize that the bridge was surrounded by fencing until I was halfway up the bridge. Safety first I guess. Darn it.
Photo info: 52.5mm focal length, f/13, 10 sec, ISO 200, 8:18 pm
Subscribe to:
Posts (Atom)

