Sunday, November 30, 2008

Bicycle Expo

This past weekend, my buddy Phil, who runs rideSFO put on the Bicycle Expo & Swap at the Cow Palace in San Francisco. Thousands of riders gathered to check out new gear, watch BMXers tear it up on an indoor course, buy used stuff from other bicyclists, and generally revel in the joy that is riding a bike.I took over 1600 photos on Saturday, so I'll have lots to write about this coming week. Stay tuned!

Saturday, November 29, 2008

Rainy Commute

I haven't taken too many rainy photos, because I bought my camera in the summer, so when the weather turned drizzly last Wednesday, I had to pull out my camera. I took the top photo on the train ride from Oakland to San Francisco. The photo on the left is of the parking lot at the Rockridge BART station near my house. You can see a few more of my rainy photos here.

Friday, November 28, 2008

A Few More Thanksgiving Pics

In the last post, my family looked angry, but that's only because I asked them to pose like that for me. We had lots of fun being silly in front of the camera. I always prefer to look at funny photos over canned smiley ones.

More Fun With Cloning

Over Thanksgiving I took some photos of my family. Finding an uncluttered background at my mom's place for a group shot was difficult. The best place I could find was along the hallway, but there was an annoying calendar and thermostat in the way. I composed the photos as best I could, but I still needed the help of Photoshop's clone stamp tool. I've been looking for an excuse to experiment with it and this was the perfect opportunity. Removing stray elements in the background really cleaned up the photo. Here's the version with the cluttered background: I still have a lot of room for improvement. In some of the photos, you can easily see where I've applied the clone tool. Practice makes perfect and I need to keep practicing. For more information about the clone stamp, go to this page.

Thursday, November 27, 2008

Happy Thanksgiving!

Happy Thanksgiving everyone! This year, my brother and I gave my mom a break and cooked dinner. My brother took care of the turkey, while I prepared all the fixings, including, of course, the gravy. We started early in the afternoon, so sunlight was still streaming through the window when when my brother was done roasting the bird. Natural light is always preferable to artificial light, so I took a break to snap off these photos. And of course, I'm going to end this post with a gratuitous gravy shot!

Tuesday, November 25, 2008

Nighttime Shots In Emeryville

Flash info: Unknown flash power and zoom, 9:00 camera left, 6 feet away.
Flash info: Unknown flash power and zoom, 5:00 camera right, 4 feet away.
I promise (fingers crossed behind my back) that this is the last post from my night mission with Brian. Work and an expanding social life is creeping into my photography time. I hope to make it up by taking lots of photos of my family over Thanksgiving. These shots of Brian were taken in Emeryville overlooking Oakland. The artificial light is pretty harsh. I tried to set up the umbrella, but it was so windy that I could barely hold onto it. If I had attached the umbrella to the stand, I would have lost my entire lighting kit to the dark cold waters of the bay! I'm happy that after a lot of practice, I was able to set up and take down my flash-on-a-stand very quickly. We were both cold and Denny's was beckoning.

Monday, November 24, 2008

More Nighttime Fun

For a change of pace from seeing many me's, here's a single shot of my buddy Brian, lit up by invisible multiple me's. I had Brian stand still while I ran around hitting him with my flash. I flashed him at 8:00 camera left and 4:00 camera right. I don't remember if I flashed him from directly behind. The large patch of white light near his feet and shadow in front of him makes me think that I did. I only wish Brian wasn't wearing a black vest. The lit areas of the building behind the vest "seeped" through. Exposure info: 52.5mm focal length, 15 sec, f/11, ISO 100, 12:09am. Flash info: Flash with dome diffuser at 1/4 power, 14mm zoom, handheld. Post-processing in Lightroom: Increased exposure 1/3 stop, increased highlight recovery 40%, increased clarity 60%, reduced color temperature.

Sunday, November 23, 2008

Attack of the Clones

Exposure info: 52.5mm focal length, 20 sec, f/9, ISO 100, 11:51pm. Flash info: Flash with dome diffuser at 1/4 power, 14mm zoom, handheld. Post-processing in Lightroom: Auto tone, reduced color temperature, increased black clipping. After taking photos of the Mormon temple, we drove over to the Greek cathedral next door. I think we were trespassing, but there were no signs telling us NOT to come in. So what do Brian and I do when we see a lovely cathedral surrounded by a gigantic courtyard? We experiment! This is not a multiple exposure shot, nor was it created it by combining several photos. I created this shot by standing and firing off the flash (by pressing the test button) in four different spots. It was very dark, so there were only two ways in which the camera could record my presence: 1. I stood still for twenty seconds. 2. I lit myself with artificial light. By taking advantage of these two facts, I could "clone" myself. I didn't have to worry about the camera capturing the moments when I transitioned between positions, because I knew I could "outrun" the camera's ability to record my presence. When I was in position, I fired off the flash, which allowed the camera to capture my image. I ran to the next position and repeated the process until the shutter finally closed. Next time Brian and I go out, I'll record our shoots on video. It should be entertaining watching two grown men run around a church in the dead of night! The following photo is similar to the one above, but I'm not sure why I'm more overexposed in this shot. It could be that I held the flash closer to me. The clone in the middle is jumping in the air. :-) Can you spot Brian in the photo? He didn't crank up the power on his flash high enough to fully expose himself. You can see all the photos from our late night foray here.

Saturday, November 22, 2008

Mormon Temple at Night

Exposure info: 52.5mm focal length, 30 sec, f/18, ISO 100, 11:21pm. Post-processing in Lightroom: Cropped, reduced color temperature, increased green tint. My good buddy Brian and I went out for some late night shooting around Oakland and Emeryville. Our first stop was the Mormon temple in Oakland. I always wanted to get a closer look at it, but dropping by at night was not a great idea. The temple was locked up and there was at least one guard keeping an eye on us. Shivering, we took a few shots then headed to the Greek cathedral next door for the real fun. More to come.

Thursday, November 20, 2008

Possible Passport Photo?

After I finished imitating the new Captain Kirk, I messed around with lighting one side of my face more than the other. Because the flash was snooted and less than two feet from my face, I only had to move the flash a little bit to get the effect I wanted. While playing around, I decided to take a photo for my passport. Sure I look like a wreck, but this is what customs officials see after a long plane ride. I wonder if the government will accept it?

Wednesday, November 19, 2008

Step By Step: Faking Creepy Captain Kirk

I'm a rabid fan of Star Trek. I'm also a big fan of J.J. Abrams, so naturally I'm very excited about the Star Trek movie coming out next May. My buddy Swarup showed me a creepy picture of the new Captain Kirk (played by Chris Pine). I liked it so much, that I wanted to imitate it. In the same spirit as my faking Platon post, I offer for your reading pleasure, my step by step guide to faking creepy Captain Kirk.
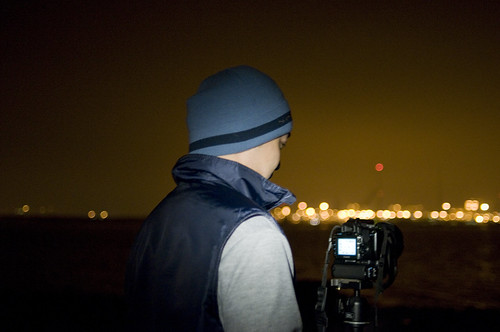
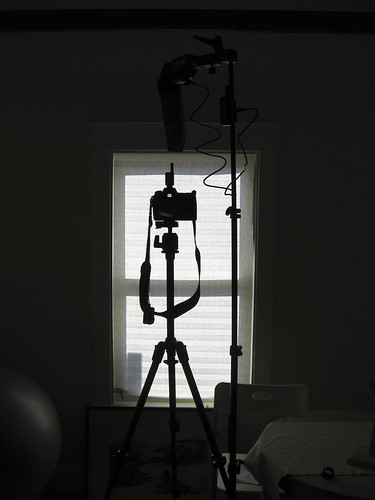
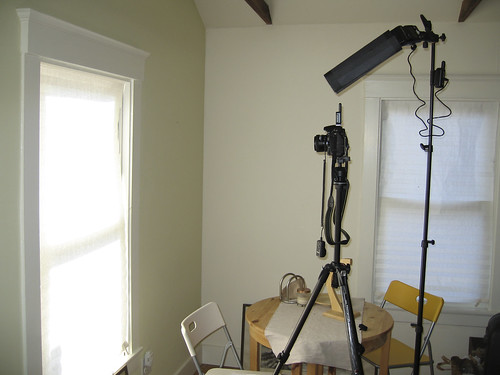
Shot of my setup. Imagine that I'm standing in front of the window facing out towards the camera.
Imagine that I'm standing on the left, next to the window.
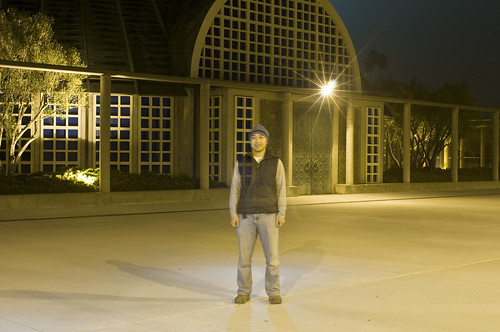
View from in front of the camera.
Step 1: Figure out where to place my head.
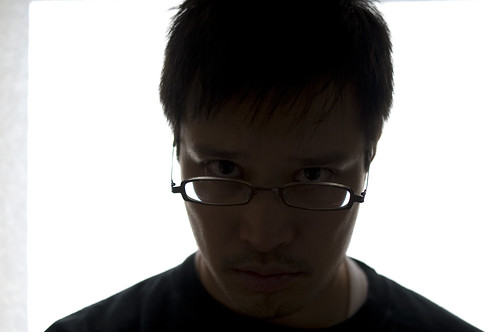
Step 2: Capture what I want of the ambient lighting. I overexposed the window so that the curtain lines disappeared into a solid mass of white light.
Step 2: Increase the exposure some more so that more of the ambient light wraps around my temples, cheeks, and neck.
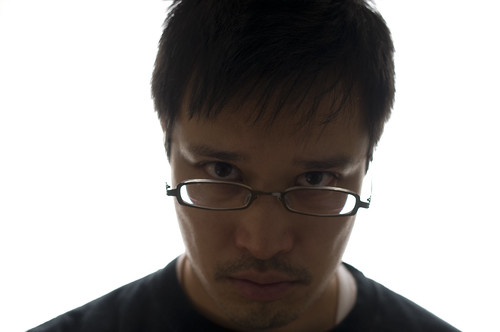
Step 2: Increase the exposure a little more to bring out my face.
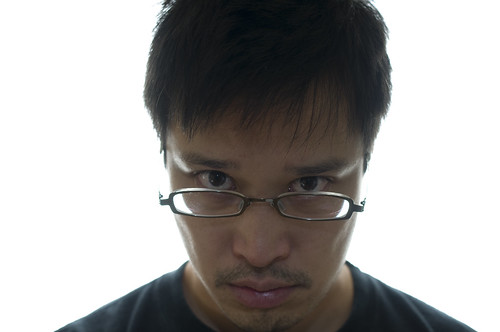
Step 3: Add the flash and play with it. Flash is set to around 1/32 power. This is far too much power. I use a snoot to restrict the artificial light to just the middle of my face. I don't want the flash to contaminate the cool wraparound lighting provided by the window.
Step 3: Add the flash and play with it. Dial down the power to 1/128.
Step 3: Add the flash and play with it. Reduce the output of the flash further by pulling down its built-in wide flash adapter. The snoot restricts the light coming out of the flash, so using the adapter only eats up the flash output.
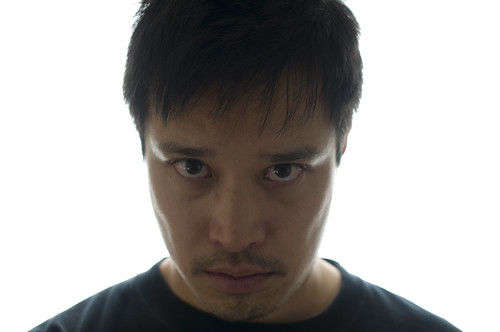
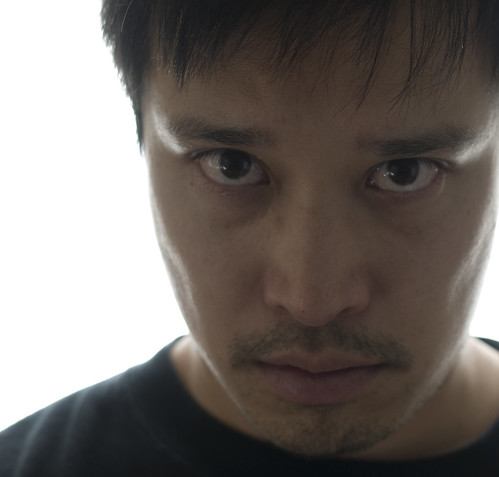
The flash doesn't fire and voila! This is my favorite shot. Sometimes a flash isn't necessary!
To create the final image, I opened the photo above in Lightroom and cropped it. I then reduced the vibrance by 20%. That's it! It's ironic that I set up the fancy flash on a fancy stand, yet the photo I liked best was the one lit exclusively by the sun. :-) What's also cool is how quickly I shot off thirty photos. It took less than half an hour and most of that time was spent acting silly for the camera. This was really enjoyable and as always, I learned a few things: 1. If you see a cool photo, try imitating it. It's fun and you'll always learn something new. 2. Be flexible and take advantage of what you've got. When I started planning for this shot, I envisioned using both my flashes and some DIY reflectors to help shape the light. The complexity was off-putting, so I was reluctant to try it out. Luckily I noticed the beautiful diffused light streaming through my window and threw away my original plans!
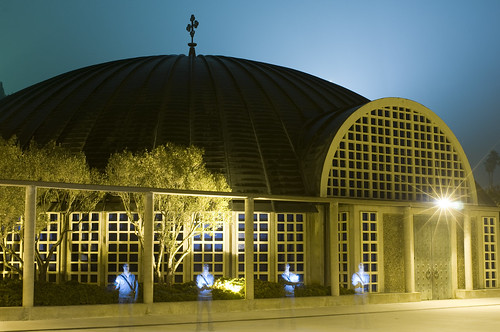
Tuesday, November 18, 2008

Another attempt at Joey L's Manual HDR Technique

A few days ago, I posted up my first attempt at creating an HDR image by following Joey L's tutorial. I didn't like the result, so I tried again.
Original photo
Original photo underexposed by 1 1/3 EV
Original photo overexposed by 1 1/3 EV
Image of the work in progress in Photoshop. The top layer is the overexposed image, while the bottom layer is the underexposed image. Removed large chunks of the sky from the overexposed image, so that the underexposed image peeks through by using the select tool to draw rectangles then hitting the delete key.
Image of the work in progress in Photoshop. Used the eraser tool to remove smaller parts of the sky from the overexposed image, so that the underexposed image peeks through.

Update: I went home and noticed I had a bunch of notes about the creation of this image that I forgot to share. So here we go. After removing large amounts of the sky through brute force with the selection tool, it was time for more delicate work. I varied my eraser brush size from 10-50px. I set the opacity to 100% (to match the amount I removed with the selection tool). I varied the flow between 20-100%. Hardness was set to 100%. For an explanation of what these parameters do, go here. Now I was left with a very thin boundary between the sky and buildings. Modifying this boundary was very difficult. I had to work slowly, often having to undo my mistakes, but eventually I finished. During this tedious stage, I continuously adjusted the four parameters until I was happy with the results: Brush size: 30-80px Opacity: 50-100% Flow: 50-75% Hardness: 50-100% It was very time-consuming and I wonder if it was really worth it. But I know that being able to modify parts of an image is very important in photography, so I'll continue practicing this technique while researching alternative methods. Having a tablet PC was very helpful, because I used the stylus to draw directly on the screen. For other types of computers, a Wacom tablet would work just as well.
My final image still looks too fake for me. I spent a lot of time using the eraser tool. I need to find a faster way to do this!

Monday, November 17, 2008

Pets Galore

This weekend I hung out with my buddies in San Francisco. They have a ton of pets. Animals are hard to shoot, because they usually don't sit still long enough for me to take a good shot. I got lucky this time because the pets were feeling lazy and just let me shoot away. You can see the rest of the photos here.

iPhone Pics: Purple Sky Over San Francisco

What sucks about this photo? It was taken with my phone. In the past I extolled the virtues of the camera phone, so why am I complaining now? Because as good as camera phones are, they are nowhere near as good as a DSLR. The one day I decided not to bring my camera into work, was the one day the sky decided to become purple. I'm disappointed I missed the opportunity to capture such a rare sight.

Sunday, November 16, 2008

Practicing Joey L's ‘Manual HDR’ Technique

Who's Joey L? He's an amazing photographer who creates stunning images...at the tender age of 18. Wow. I enjoy reading his blog and looking at his work. He's not only a great photographer, but a great teacher as well. He created a tutorial that is available for purchase as a DVD or instant download. In the first lesson Joey shows how he creates HDR-like images without the use of an automatic HDR generation tool such as Photomatix (what I use to create my HDR images). He prefers to use Lightroom and Photoshop instead. The advantages are that you only need one file and you (not the computer) are in control, so the final image looks more realistic. One important note: start with a RAW image, because unlike JPG, RAW files provide a latitude of about three stops of exposure both ways (-3 to +3 EV). If you don't believe me, check out my unscientific test. If you want to learn more about HDR images and/or want to learn how to create one, read this post. In a nutshell, Joey L's technique is very simple. Start with one RAW file. Use Lightroom to underexpose the first image by an amount that brings out the details in the shadows. Do the opposite to the second image: overexpose it by an amount that brings out the details in the highlights. Export these two new images into Photoshop (export them as psd files). Keep in mind that the greater the difference in exposure between the two images, the more fake the final image will look. This is not necessarily a bad thing, it all depends on what kind of look you want to end up with. In Photoshop, combine the two images into one. Each image is a layer. Use the eraser tool to erase parts of the top image. The bottom image will "bleed through" the areas of the top image that were erased. Therefore, in one image, you get the best of both worlds! It's actually easier to do it than to talk about it. In my example (taken in Park City, Utah), I wanted to underexpose the sky (to give it a moody feel), yet overexpose the rest of the photo in order to bring out the details of the mountain and city. I started with this photo: 1. In Lightroom, I underexposed the image to bring out the moodiness of the sky. I think I underexposed it by about 2 EV. I then exported it into Photoshop: 2. In Lightroom, I overexposed the image to bring out the mountain and city. I think I overexposed it by less than 1 EV. I then exported it into Photoshop: Now for the nitty-gritty tasks done with Photoshop: 3. Open both images. Copy one image and paste it onto the second image as a second layer. Do this by selecting one image and dragging it on top of the second image while holding down the Alt and Ctrl keys (on a computer running Windows). Make sure that the image you dragged over is aligned properly with the other image. 4. Now the fun part begins. Select the eraser tool and play with these parameters: brush size, hardness, opacity, and flow. For more information about the eraser, go to this page. Here's a quick rundown: Brush size: Self-explanatory. Hardness: The higher the number, the more distinct (hard) the edges of the eraser becomes. Opacity: 100% erases completely, while 0% erases nothing. Flow: The length of time required for the eraser to apply its effect. 100% means the erasure occurs the instant you click the mouse. 0% means the eraser won't erase no matter how long you hold down the button on your mouse. Use a lower percentage if you want more control. These are the values I used: brush size: 100-1000px, hardness: 2%, opacity 25-75%, and flow 20-100%. I changed the values depending on what I was erasing. When erasing the big areas of the sky not close to the mountain or buildings, I sped things up by setting the brush size to about 1000px and flow to 100%. Dealing with the edges where the the over and underexposed images met required more finesse, so I shrunk the brush to about 100px and set the flow to 20%. I adjusted the opacity in a willy-nilly manner, because I wanted to experiment. It was a mistake to leave the hardness at 2%. Keep reading to see why. And voila! Here's the final image: Frankly, I DON'T LIKE the end result. It looks fake, because the sky is too dark (or the mountain and city are too bright). One reason for this is because the difference in exposure levels between the dark and bright images was too large for this scene. I also don't like how I accidentally darkened the top of the mountain. I think one reason for this is that I didn't set the hardness properly. It should have been more like 80% instead of a mere 2%. It would have made it easier for me to erase the sky without touching the mountain. I thought about just throwing this image away and starting over, but I think it's good for me to show my failures. Hopefully we can all learn from my mistakes. Now you might be thinking, aren't there other ways of doing this besides using the eraser tool? What about the magic wand selection tool? As Joey says in his tutorial, he's demonstrating the ghetto way of doing this. Do whatever is most comfortable for you. I plan on testing out the magic wand tool after I figure how how to use the eraser tool properly.

Panning, Part 3

Exposure info: 52.5mm focal length, 1/2 sec, f/6.3, ISO 400, 5:52pm. This is my third failed attempt at panning. I wanted to photograph the landing strip and buildings blurring by as the plane wing remained stationary. A big problem was I took this shot as the landing gear touched the ground, so the plane was shaking up and down. But to be honest, the photos I took of the plane as it approached the ground, but before it landed weren't good either. My hands weren't steady even when I braced my arms against the window frame and seat. No big deal, I just have to keep on practicing!

Shooting From A Plane

On the flight back from Utah, I asked my buddy Manny to give me the window seat, so that I could take some photos. There was a fella in an aisle seat near me who was not so fortunate. Although he was carrying a DSLR that is an upgrade over mine (and nearly twice the price), it was useless, because he couldn't take any photos from his position. I really enjoyed the irony. Chalk it up to schadenfreude. I also took some photos while the plane was landing. When the crew proclaimed, "turn off all your portable electronics", were they including DSLR's too? I wasn't sure, but I was willing to risk everyone's safety for the sake of my art. ;-) You can see all the photos here.

Saturday, November 15, 2008

I'm Not A Photojournalist

I'm not a photojournalist. I have no compunctions about interfering or interacting with my friends in order to get the shot I want. These two are good examples. On the left, I wanted Kasey's face to be lit by the sun streaming through the blinds. Unfortunately, she sat back against her dad and away from the sun. Since she's too young to understand verbal directions from me, I tempted her with the bright yellow bag of chips. I dangled it in front of her and when she grabbed it, I pulled her forward gently. Booya! I got my photograph. On the right, I wanted to record Kasey giving me a fist bump. Just because I carry the camera, doesn't mean I need to always be silent and unobtrusive.

Shy People

I love trying to surreptiously take shots of friends who don't like their photos taken. In Utah, it seemed like a few of them didn't want me poking my camera in their faces. Since they're my friends, I took it up as a challenge. I caught them off-guard many times, but here are some instances where they thwarted my attempts. No worries, I was successful many more times than not. :-)