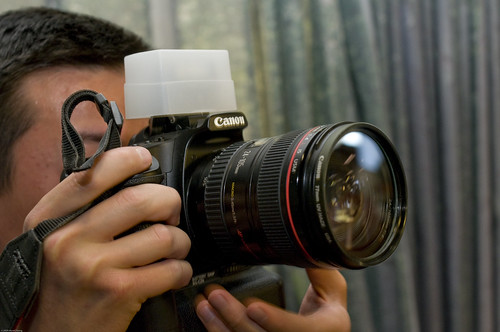
 My buddy Basile and I shot an event at work, but during the middle of it, his external flash overheated. Did he quit? No way. He took the diffusion dome off of the flash, popped up his on-camera flash and dropped the dome on top of it. Ingenious! It's not the best solution, because the dome ate away a lot of the flash's power, but it was a great quick fix.
Saturday, February 21, 2009
Quick On-Camera Flash Diffuser
My buddy Basile and I shot an event at work, but during the middle of it, his external flash overheated. Did he quit? No way. He took the diffusion dome off of the flash, popped up his on-camera flash and dropped the dome on top of it. Ingenious! It's not the best solution, because the dome ate away a lot of the flash's power, but it was a great quick fix.Tuesday, February 17, 2009
Sneaking Some Humanity Into My Shots


Monday, February 16, 2009
Green Sheet Fun
 For an upcoming wedding save-the-date shoot with my friends, Brian (brother of the future groom) and I need a green screen. We want to shoot the couple in front of a green screen and then swap out the background in Photoshop. Instead of paying who-knows-how-much for an actual green screen, I went over to a fabric shop and looked for the cheapest piece of ugly bright green cloth that I could find. It needed to be three things:
1. Cheap.
2. Non-reflective. Why? Because I don't want unnecessary glare.
3. An ugly color that no one in their right mind would wear. Why? Because I want to easily erase the color in Photoshop, thus ending up with an image of just the person with no background.
Creating the above image was very easy. The post-processing took less than five minutes, even though Amy was peeking over my shoulder and harassing me the whole time! Here's how I did it:
I bought a sheet of cloth roughly one yard wide and three yards long for under ten dollars. I came home, hung the sheet on a rafter, and since Amy refused to be the test subject, she shot me:
For an upcoming wedding save-the-date shoot with my friends, Brian (brother of the future groom) and I need a green screen. We want to shoot the couple in front of a green screen and then swap out the background in Photoshop. Instead of paying who-knows-how-much for an actual green screen, I went over to a fabric shop and looked for the cheapest piece of ugly bright green cloth that I could find. It needed to be three things:
1. Cheap.
2. Non-reflective. Why? Because I don't want unnecessary glare.
3. An ugly color that no one in their right mind would wear. Why? Because I want to easily erase the color in Photoshop, thus ending up with an image of just the person with no background.
Creating the above image was very easy. The post-processing took less than five minutes, even though Amy was peeking over my shoulder and harassing me the whole time! Here's how I did it:
I bought a sheet of cloth roughly one yard wide and three yards long for under ten dollars. I came home, hung the sheet on a rafter, and since Amy refused to be the test subject, she shot me: The setup was simple, just a flash bounced off of an umbrella at camera left:
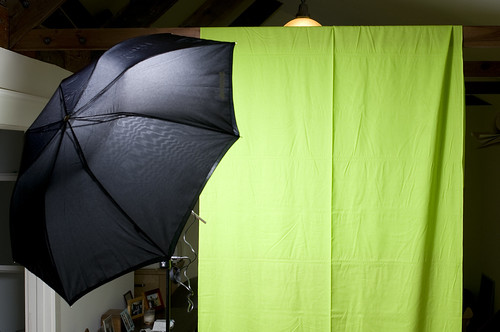 I then found an existing photo of Amy to combine with my green sheet shot:
 I then erased the green behind me:
 Finally, I combined the two images in Photoshop, resized myself to look like I was actually standing next to Amy, and voila! World's funniest photo was born!
I left the final image a bit unpolished, because I wanted to show how much you can accomplish in just five minutes of post-processing. I also wanted to leave some of the mistakes alone, so that I could learn from them.
So here's what I learned:
1. Minimize the light reflecting off of the background and back on the subject. It's bad because it casts a green tint that is difficult to remove. You can see this on my left shoulder.
2. Minimize the amount of shadow that your subject casts on the background. These shadows darken parts of your sheet, so your sheet is no longer a continuous shade of green. This makes it more difficult to remove it in Photoshop.
3. Iron out the wrinkles and crease lines in your sheet. These imperfections cause shadows which are bad (see #2).
I glossed over what I did in Photoshop. If you want to learn more about how I removed parts of one image and then combined it into the second image, read this.
For those keeping score, this post is related to the top secret experiment I mentioned last month.
Finally, I combined the two images in Photoshop, resized myself to look like I was actually standing next to Amy, and voila! World's funniest photo was born!
I left the final image a bit unpolished, because I wanted to show how much you can accomplish in just five minutes of post-processing. I also wanted to leave some of the mistakes alone, so that I could learn from them.
So here's what I learned:
1. Minimize the light reflecting off of the background and back on the subject. It's bad because it casts a green tint that is difficult to remove. You can see this on my left shoulder.
2. Minimize the amount of shadow that your subject casts on the background. These shadows darken parts of your sheet, so your sheet is no longer a continuous shade of green. This makes it more difficult to remove it in Photoshop.
3. Iron out the wrinkles and crease lines in your sheet. These imperfections cause shadows which are bad (see #2).
I glossed over what I did in Photoshop. If you want to learn more about how I removed parts of one image and then combined it into the second image, read this.
For those keeping score, this post is related to the top secret experiment I mentioned last month.Thursday, February 12, 2009
Soft Light Sources Are Everywhere
 Soft lighting wraps around a subject and casts shadows with very soft edges. The result can be gorgeous.
You don't have to buy an expensive giant soft box to get soft lighting. Just about anything can be a soft light source as long as it appears large to your subject. Normally a laptop screen wouldn't be considered a large source of light, but since the screen is less than two feet from Amy, the screen looks large relative to her face. The laptop therefore bathes her in beautiful soft light.
An iPhone can also act as a tiny softbox. Strobist.com has a great post about it.
Soft lighting wraps around a subject and casts shadows with very soft edges. The result can be gorgeous.
You don't have to buy an expensive giant soft box to get soft lighting. Just about anything can be a soft light source as long as it appears large to your subject. Normally a laptop screen wouldn't be considered a large source of light, but since the screen is less than two feet from Amy, the screen looks large relative to her face. The laptop therefore bathes her in beautiful soft light.
An iPhone can also act as a tiny softbox. Strobist.com has a great post about it.Wednesday, February 11, 2009
Treat Your Subject and Background Separately
I ended my last post with a cliffhanger which I promised to resolve nearly two weeks ago, but it was a lot more difficult to write than I originally thought! Is this post worth the wait? I hope it is! So how did I make the second photo look so different from the first? The answer is: I treated my subject and background separately.
What does that mean? It means that in the right circumstances you can break up a scene into two parts: the subject and the background, and then treat them differently. Why would you want to do that? Because it creates an image that looks more like what our eyes naturally see. Our eyes are amazing instruments that can see the clouds in a bright sky while simultaneously make out the details under a shady tree. Our digital camera is not as sensitive as our eyes, so our photos often look washed out or too dark. A common situation is when we try to take a photo of someone under the bright sun. In this case, if the subject is perfectly exposed, the sunlit background looks too bright. If we underexpose the background then the subject looks too dark. Amy looks good, but the sky is too bright.
 The sky looks good, but Amy is too dark.
All this sounds great, but it also sounds complicated. Don't worry, it's actually easy to do with a little practice. You first need the right equipment. I can hear you crying, "Oh no! Here's the catch! I need to spend thousands on a fancy camera and lens!" Worry not, because all you need is:
1. A digital camera that allows you to manually control the exposure time (shutter speed), aperture, and hopefully ISO.
2. A flash that lets you control the amount of light it puts out. This flash can be built into the camera or even better, be an external unit.
You can use a fancy DSLR or a basic point-and-shoot as long as it meets the criteria above. For you off-camera lighting fans, you'll notice that I didn't stress the requirement that the flash be off the camera. I'll address this in a future post, for now I'm keeping things simple.
Ok, you've got the camera and a flash. Now what? Time to treat your subject and background separately. I like to handle the background first, because it's easier to deal with: the background doesn't fidget and it doesn't get grumpy when I fiddle around with my camera's controls. Take a picture of the background and check your camera's LCD. Is it too bright? Too dark? Play with the exposure time, aperture, and ISO until the background looks right. Remember that your shutter speed must not be faster than your camera's maximum flash sync speed (check your camera's manual). I assume that you understand how adjusting the exposure time, aperture, and ISO affects the overall brightness of your image as well as things like depth of field, noise, etc. If you do not understand these terms, look for my series of basic lessons that I'm posting later this month.
The sky looks good, but Amy is too dark.
All this sounds great, but it also sounds complicated. Don't worry, it's actually easy to do with a little practice. You first need the right equipment. I can hear you crying, "Oh no! Here's the catch! I need to spend thousands on a fancy camera and lens!" Worry not, because all you need is:
1. A digital camera that allows you to manually control the exposure time (shutter speed), aperture, and hopefully ISO.
2. A flash that lets you control the amount of light it puts out. This flash can be built into the camera or even better, be an external unit.
You can use a fancy DSLR or a basic point-and-shoot as long as it meets the criteria above. For you off-camera lighting fans, you'll notice that I didn't stress the requirement that the flash be off the camera. I'll address this in a future post, for now I'm keeping things simple.
Ok, you've got the camera and a flash. Now what? Time to treat your subject and background separately. I like to handle the background first, because it's easier to deal with: the background doesn't fidget and it doesn't get grumpy when I fiddle around with my camera's controls. Take a picture of the background and check your camera's LCD. Is it too bright? Too dark? Play with the exposure time, aperture, and ISO until the background looks right. Remember that your shutter speed must not be faster than your camera's maximum flash sync speed (check your camera's manual). I assume that you understand how adjusting the exposure time, aperture, and ISO affects the overall brightness of your image as well as things like depth of field, noise, etc. If you do not understand these terms, look for my series of basic lessons that I'm posting later this month. Exposure: 52.5mm focal length, 1/320 sec, f/14, ISO 100, 3:18pm.
Lighting: Just the sun.
Now that your background looks nice, it's time to work on your subject. Ask them to stand in the frame and take another shot. One of three scenarios will occur:
1. They look perfect. Great! You're done.
2. They look too dark. You'll need to aim your flash at your subject. Tweak the power of the flash until they look good.
3. They look too bright. This is rarely the case unless you're shooting someone under a spotlight. Most likely your subject is getting blasted by the bright sun. If that's the case, move them to a shadier spot and repeat the process.
In my example, Amy looked too dark, so I added a flash. After tweaking the amount of light coming out of the flash, I came up with this shot:
Exposure: 52.5mm focal length, 1/320 sec, f/14, ISO 100, 3:18pm.
Lighting: Just the sun.
Now that your background looks nice, it's time to work on your subject. Ask them to stand in the frame and take another shot. One of three scenarios will occur:
1. They look perfect. Great! You're done.
2. They look too dark. You'll need to aim your flash at your subject. Tweak the power of the flash until they look good.
3. They look too bright. This is rarely the case unless you're shooting someone under a spotlight. Most likely your subject is getting blasted by the bright sun. If that's the case, move them to a shadier spot and repeat the process.
In my example, Amy looked too dark, so I added a flash. After tweaking the amount of light coming out of the flash, I came up with this shot:
 Exposure: 52.5mm focal length, 1/320 sec, f/22, ISO 100, 3:36pm.
Lighting: Bare flash at 1/2 or full power, unknown zoom, 8:00 camera left, 4 feet away from subject, connected with a wireless remote trigger.
You may have noticed that there is 1 1/3 stop difference in aperture between the two shots. In the 18 minutes between photo #1 and #2, I took a lot of shots and I decided I wanted to underexpose the background even more, so I closed down the aperture. I also reframed Amy to remove the barrier cables from the frame and catch the reflection of the sun off of the reservoir. I also lightened her face a bit in Lightroom, because the flash was too powerful. I should have decreased the power of the flash to 1/4.
Important note: The subject and the background must be far enough apart from each other that the flash lights only the subject. If they are too close to each other, the flash will affect the background and you won't be able to treat them separately.
This won't be easy at first, but with enough practice, this technique will become second nature. The results are worth it!
If you want to learn more about how to treat your subject and background separately, read this post from strobist.com, it's far better written. :-)
Exposure: 52.5mm focal length, 1/320 sec, f/22, ISO 100, 3:36pm.
Lighting: Bare flash at 1/2 or full power, unknown zoom, 8:00 camera left, 4 feet away from subject, connected with a wireless remote trigger.
You may have noticed that there is 1 1/3 stop difference in aperture between the two shots. In the 18 minutes between photo #1 and #2, I took a lot of shots and I decided I wanted to underexpose the background even more, so I closed down the aperture. I also reframed Amy to remove the barrier cables from the frame and catch the reflection of the sun off of the reservoir. I also lightened her face a bit in Lightroom, because the flash was too powerful. I should have decreased the power of the flash to 1/4.
Important note: The subject and the background must be far enough apart from each other that the flash lights only the subject. If they are too close to each other, the flash will affect the background and you won't be able to treat them separately.
This won't be easy at first, but with enough practice, this technique will become second nature. The results are worth it!
If you want to learn more about how to treat your subject and background separately, read this post from strobist.com, it's far better written. :-)
Amy looks good, but the sky is too bright.The sky looks good, but Amy is too dark.Exposure: 52.5mm focal length, 1/320 sec, f/14, ISO 100, 3:18pm.
Lighting: Just the sun.
Now that your background looks nice, it's time to work on your subject. Ask them to stand in the frame and take another shot. One of three scenarios will occur:
1. They look perfect. Great! You're done.
2. They look too dark. You'll need to aim your flash at your subject. Tweak the power of the flash until they look good.
3. They look too bright. This is rarely the case unless you're shooting someone under a spotlight. Most likely your subject is getting blasted by the bright sun. If that's the case, move them to a shadier spot and repeat the process.
In my example, Amy looked too dark, so I added a flash. After tweaking the amount of light coming out of the flash, I came up with this shot:
Exposure: 52.5mm focal length, 1/320 sec, f/22, ISO 100, 3:36pm.
Lighting: Bare flash at 1/2 or full power, unknown zoom, 8:00 camera left, 4 feet away from subject, connected with a wireless remote trigger.
You may have noticed that there is 1 1/3 stop difference in aperture between the two shots. In the 18 minutes between photo #1 and #2, I took a lot of shots and I decided I wanted to underexpose the background even more, so I closed down the aperture. I also reframed Amy to remove the barrier cables from the frame and catch the reflection of the sun off of the reservoir. I also lightened her face a bit in Lightroom, because the flash was too powerful. I should have decreased the power of the flash to 1/4.
Important note: The subject and the background must be far enough apart from each other that the flash lights only the subject. If they are too close to each other, the flash will affect the background and you won't be able to treat them separately.
This won't be easy at first, but with enough practice, this technique will become second nature. The results are worth it!
If you want to learn more about how to treat your subject and background separately, read this post from strobist.com, it's far better written. :-)
Subscribe to:
Posts (Atom)

