skip to main |
skip to sidebar
Who's Joey L? He's an amazing photographer who creates stunning images...at the tender age of 18. Wow. I enjoy reading his blog and looking at his work.
He's not only a great photographer, but a great teacher as well. He created a tutorial that is available for purchase as a DVD or instant download.
In the first lesson Joey shows how he creates HDR-like images without the use of an automatic HDR generation tool such as Photomatix (what I use to create my HDR images). He prefers to use Lightroom and Photoshop instead. The advantages are that you only need one file and you (not the computer) are in control, so the final image looks more realistic. One important note: start with a RAW image, because unlike JPG, RAW files provide a latitude of about three stops of exposure both ways (-3 to +3 EV). If you don't believe me, check out my unscientific test. If you want to learn more about HDR images and/or want to learn how to create one, read this post.
In a nutshell, Joey L's technique is very simple. Start with one RAW file. Use Lightroom to underexpose the first image by an amount that brings out the details in the shadows. Do the opposite to the second image: overexpose it by an amount that brings out the details in the highlights. Export these two new images into Photoshop (export them as psd files). Keep in mind that the greater the difference in exposure between the two images, the more fake the final image will look. This is not necessarily a bad thing, it all depends on what kind of look you want to end up with. In Photoshop, combine the two images into one. Each image is a layer. Use the eraser tool to erase parts of the top image. The bottom image will "bleed through" the areas of the top image that were erased. Therefore, in one image, you get the best of both worlds! It's actually easier to do it than to talk about it.
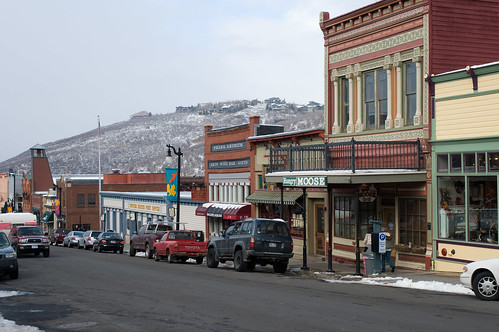
In my example (taken in Park City, Utah), I wanted to underexpose the sky (to give it a moody feel), yet overexpose the rest of the photo in order to bring out the details of the mountain and city.
I started with this photo: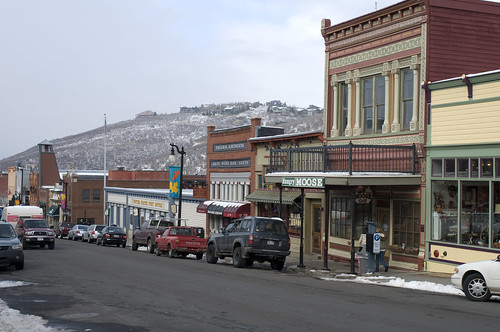 1. In Lightroom, I underexposed the image to bring out the moodiness of the sky. I think I underexposed it by about 2 EV. I then exported it into Photoshop:
 2. In Lightroom, I overexposed the image to bring out the mountain and city. I think I overexposed it by less than 1 EV. I then exported it into Photoshop:
 Now for the nitty-gritty tasks done with Photoshop:
3. Open both images. Copy one image and paste it onto the second image as a second layer. Do this by selecting one image and dragging it on top of the second image while holding down the Alt and Ctrl keys (on a computer running Windows). Make sure that the image you dragged over is aligned properly with the other image.
4. Now the fun part begins. Select the eraser tool and play with these parameters: brush size, hardness, opacity, and flow. For more information about the eraser, go to this page. Here's a quick rundown:
Brush size: Self-explanatory.
Hardness: The higher the number, the more distinct (hard) the edges of the eraser becomes.
Opacity: 100% erases completely, while 0% erases nothing.
Flow: The length of time required for the eraser to apply its effect. 100% means the erasure occurs the instant you click the mouse. 0% means the eraser won't erase no matter how long you hold down the button on your mouse. Use a lower percentage if you want more control.
These are the values I used: brush size: 100-1000px, hardness: 2%, opacity 25-75%, and flow 20-100%. I changed the values depending on what I was erasing. When erasing the big areas of the sky not close to the mountain or buildings, I sped things up by setting the brush size to about 1000px and flow to 100%. Dealing with the edges where the the over and underexposed images met required more finesse, so I shrunk the brush to about 100px and set the flow to 20%. I adjusted the opacity in a willy-nilly manner, because I wanted to experiment. It was a mistake to leave the hardness at 2%. Keep reading to see why.
And voila! Here's the final image:
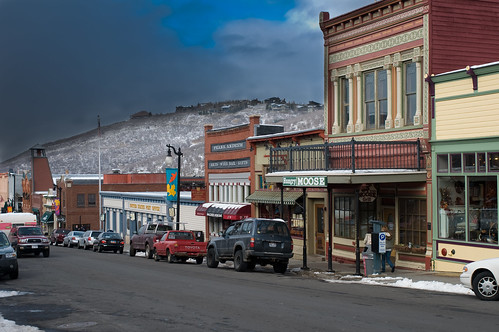 Frankly, I DON'T LIKE the end result. It looks fake, because the sky is too dark (or the mountain and city are too bright). One reason for this is because the difference in exposure levels between the dark and bright images was too large for this scene. I also don't like how I accidentally darkened the top of the mountain. I think one reason for this is that I didn't set the hardness properly. It should have been more like 80% instead of a mere 2%. It would have made it easier for me to erase the sky without touching the mountain.
I thought about just throwing this image away and starting over, but I think it's good for me to show my failures. Hopefully we can all learn from my mistakes.
Now you might be thinking, aren't there other ways of doing this besides using the eraser tool? What about the magic wand selection tool? As Joey says in his tutorial, he's demonstrating the ghetto way of doing this. Do whatever is most comfortable for you. I plan on testing out the magic wand tool after I figure how how to use the eraser tool properly.
 1. In Lightroom, I underexposed the image to bring out the moodiness of the sky. I think I underexposed it by about 2 EV. I then exported it into Photoshop:
 2. In Lightroom, I overexposed the image to bring out the mountain and city. I think I overexposed it by less than 1 EV. I then exported it into Photoshop:
 Now for the nitty-gritty tasks done with Photoshop:
3. Open both images. Copy one image and paste it onto the second image as a second layer. Do this by selecting one image and dragging it on top of the second image while holding down the Alt and Ctrl keys (on a computer running Windows). Make sure that the image you dragged over is aligned properly with the other image.
4. Now the fun part begins. Select the eraser tool and play with these parameters: brush size, hardness, opacity, and flow. For more information about the eraser, go to this page. Here's a quick rundown:
Brush size: Self-explanatory.
Hardness: The higher the number, the more distinct (hard) the edges of the eraser becomes.
Opacity: 100% erases completely, while 0% erases nothing.
Flow: The length of time required for the eraser to apply its effect. 100% means the erasure occurs the instant you click the mouse. 0% means the eraser won't erase no matter how long you hold down the button on your mouse. Use a lower percentage if you want more control.
These are the values I used: brush size: 100-1000px, hardness: 2%, opacity 25-75%, and flow 20-100%. I changed the values depending on what I was erasing. When erasing the big areas of the sky not close to the mountain or buildings, I sped things up by setting the brush size to about 1000px and flow to 100%. Dealing with the edges where the the over and underexposed images met required more finesse, so I shrunk the brush to about 100px and set the flow to 20%. I adjusted the opacity in a willy-nilly manner, because I wanted to experiment. It was a mistake to leave the hardness at 2%. Keep reading to see why.
And voila! Here's the final image:
 Frankly, I DON'T LIKE the end result. It looks fake, because the sky is too dark (or the mountain and city are too bright). One reason for this is because the difference in exposure levels between the dark and bright images was too large for this scene. I also don't like how I accidentally darkened the top of the mountain. I think one reason for this is that I didn't set the hardness properly. It should have been more like 80% instead of a mere 2%. It would have made it easier for me to erase the sky without touching the mountain.
I thought about just throwing this image away and starting over, but I think it's good for me to show my failures. Hopefully we can all learn from my mistakes.
Now you might be thinking, aren't there other ways of doing this besides using the eraser tool? What about the magic wand selection tool? As Joey says in his tutorial, he's demonstrating the ghetto way of doing this. Do whatever is most comfortable for you. I plan on testing out the magic wand tool after I figure how how to use the eraser tool properly.


No comments:
Post a Comment