For an upcoming wedding save-the-date shoot with my friends, Brian (brother of the future groom) and I need a green screen. We want to shoot the couple in front of a green screen and then swap out the background in Photoshop. Instead of paying who-knows-how-much for an actual green screen, I went over to a fabric shop and looked for the cheapest piece of ugly bright green cloth that I could find. It needed to be three things:
1. Cheap.
2. Non-reflective. Why? Because I don't want unnecessary glare.
3. An ugly color that no one in their right mind would wear. Why? Because I want to easily erase the color in Photoshop, thus ending up with an image of just the person with no background.
Creating the above image was very easy. The post-processing took less than five minutes, even though Amy was peeking over my shoulder and harassing me the whole time! Here's how I did it:
I bought a sheet of cloth roughly one yard wide and three yards long for under ten dollars. I came home, hung the sheet on a rafter, and since Amy refused to be the test subject, she shot me:

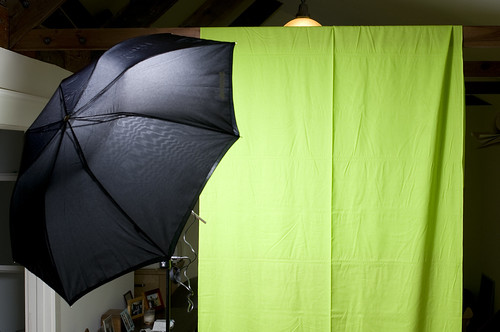
The setup was simple, just a flash bounced off of an umbrella at camera left:

I then found an existing photo of Amy to combine with my green sheet shot:

I then erased the green behind me:

Finally, I combined the two images in Photoshop, resized myself to look like I was actually standing next to Amy, and voila! World's funniest photo was born!
I left the final image a bit unpolished, because I wanted to show how much you can accomplish in just five minutes of post-processing. I also wanted to leave some of the mistakes alone, so that I could learn from them.
So here's what I learned:
1. Minimize the light reflecting off of the background and back on the subject. It's bad because it casts a green tint that is difficult to remove. You can see this on my left shoulder.
2. Minimize the amount of shadow that your subject casts on the background. These shadows darken parts of your sheet, so your sheet is no longer a continuous shade of green. This makes it more difficult to remove it in Photoshop.
3. Iron out the wrinkles and crease lines in your sheet. These imperfections cause shadows which are bad (see #2).
I glossed over what I did in Photoshop. If you want to learn more about how I removed parts of one image and then combined it into the second image, read
this.
For those keeping score, this post is related to the
top secret experiment I mentioned last month.
 For an upcoming wedding save-the-date shoot with my friends, Brian (brother of the future groom) and I need a green screen. We want to shoot the couple in front of a green screen and then swap out the background in Photoshop. Instead of paying who-knows-how-much for an actual green screen, I went over to a fabric shop and looked for the cheapest piece of ugly bright green cloth that I could find. It needed to be three things:
1. Cheap.
2. Non-reflective. Why? Because I don't want unnecessary glare.
3. An ugly color that no one in their right mind would wear. Why? Because I want to easily erase the color in Photoshop, thus ending up with an image of just the person with no background.
Creating the above image was very easy. The post-processing took less than five minutes, even though Amy was peeking over my shoulder and harassing me the whole time! Here's how I did it:
I bought a sheet of cloth roughly one yard wide and three yards long for under ten dollars. I came home, hung the sheet on a rafter, and since Amy refused to be the test subject, she shot me:
 The setup was simple, just a flash bounced off of an umbrella at camera left:
 I then found an existing photo of Amy to combine with my green sheet shot:
 I then erased the green behind me:
 Finally, I combined the two images in Photoshop, resized myself to look like I was actually standing next to Amy, and voila! World's funniest photo was born!
I left the final image a bit unpolished, because I wanted to show how much you can accomplish in just five minutes of post-processing. I also wanted to leave some of the mistakes alone, so that I could learn from them.
So here's what I learned:
1. Minimize the light reflecting off of the background and back on the subject. It's bad because it casts a green tint that is difficult to remove. You can see this on my left shoulder.
2. Minimize the amount of shadow that your subject casts on the background. These shadows darken parts of your sheet, so your sheet is no longer a continuous shade of green. This makes it more difficult to remove it in Photoshop.
3. Iron out the wrinkles and crease lines in your sheet. These imperfections cause shadows which are bad (see #2).
I glossed over what I did in Photoshop. If you want to learn more about how I removed parts of one image and then combined it into the second image, read this.
For those keeping score, this post is related to the top secret experiment I mentioned last month.


1 comment:
This is awesome beyond words!!! LOL, I LOVE IT!
Post a Comment